It seems like everyone's making apps these days, and maybe you want to be part of it, too.
Maybe it's to help you build that passive income you've always wanted, maybe it's a hobby, or maybe you just want to cross it off your bucket list.
It's hard to believe App Stores have only been around since 2008, a year after the release of the first iPhone in 2007. At that point there were only over 800 apps in the App Store. Now, there are over 2.2 million iOS apps in the App Store alone (as of May 2017).
Knowing there's massive competition, you still want to go ahead and release an app yourself. That's great. A little competition never hurt anyone.
You've done the hard work of designing, developing, and testing your app, and you're ready to upload your build.
So how do you get your new, well-built, and well-designed app noticed in an ecosystem where everything is fighting for attention already?
First off, put together a really great store page to make sure when it's seen, it gets downloaded. A catchy title and making sure it's placed in the right category can get you far, but there are a few more things you can do to improve your app’s chances of getting discovered.
A quick note before we begin…
Developing an app requires an overall knowledge of the different areas within the Developer Console, so before releasing it to the App Store, you'll need to have already done the following things:
- Used XCode to create your build
- Created debug, development, test, and release builds
- Signed builds
- Created provisioning profiles
- Fully tested your app
- Created an Apple Developer account for iOS (be aware this requires a yearly purchase of $99)
If you’ve already done all these, then you’re ready to go.
Getting Started
You should know from your app's design and development stages, what devices you're targeting, as this will have informs the design. Therefore, you should also know which resolutions and sizes you'll need to create images and app icons. Refer back to your documentation if you can't remember the specifics.
There are a number of configuration screens that you’ll need to complete when preparing your app for release.
You should also know which languages and countries your app will be available in, because the translations should either be included in the initial release or planned for at a later stage in your production schedule.
The Developer Console
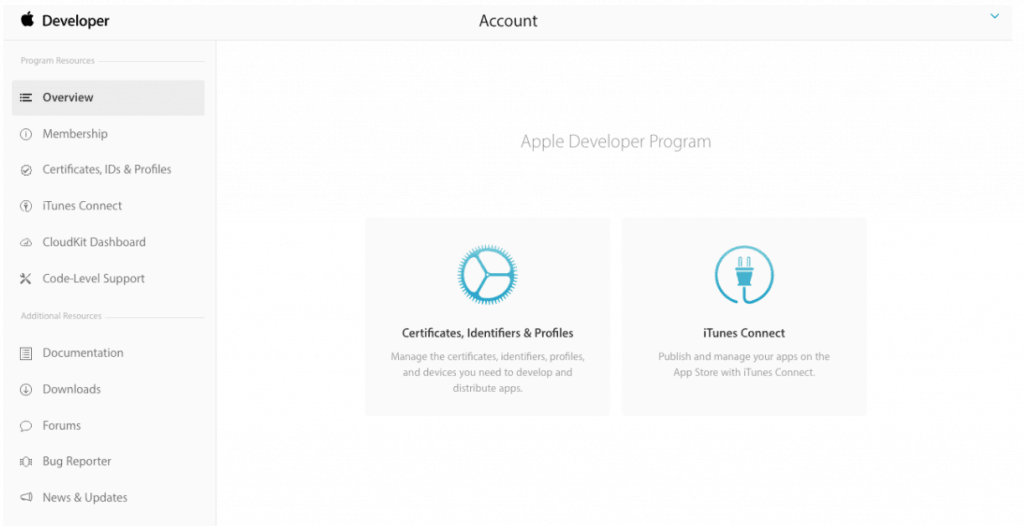
The Developer Console is the dashboard for setting up the information about your app and managing your App Store account.
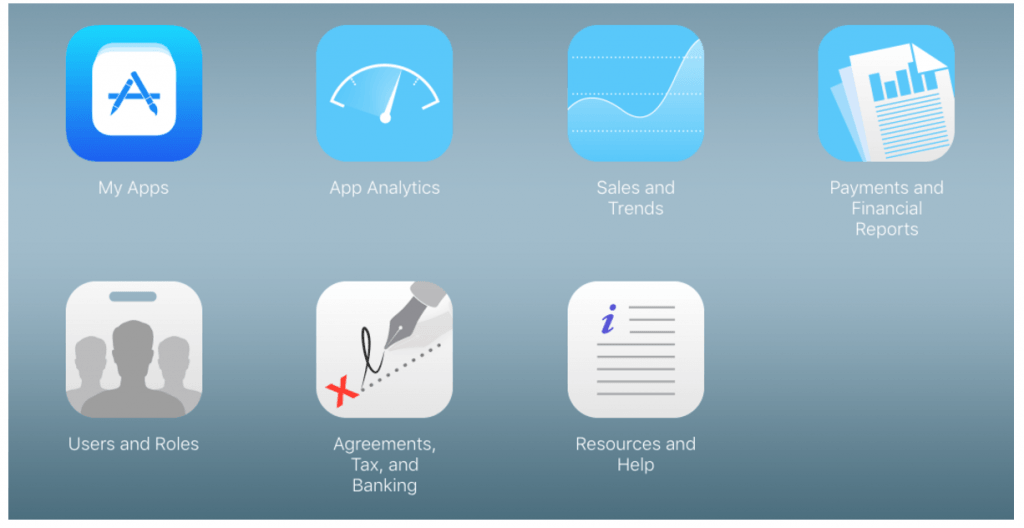
There are many areas to the Developer Console. Once you have an account, make sure you explore all the areas, familiarizing yourself with what you can do and anything more you need to do to set up.
The section you'll mostly work within when releasing your app is the My Apps section.
Every app you release to the store has an individual place in this section. Once you have created a new app in this area, you are ready to begin.
The details that make up your App Store page come directly from the App Store information you include here. And your App Store page only includes the information you include on these screens, so you need to be thorough. These details can be visible on your page—like the description, title, and screenshots—or work in the background—like keywords.
Double-check before you submit your app for review, as submissions from new developers could take up to a week to pass submission. If you have to make changes to this information, you have to start again from day one.
Configuring your App Information
Once you're familiar with the Developer Console, you need to configure, and then add settings and the details for your app.
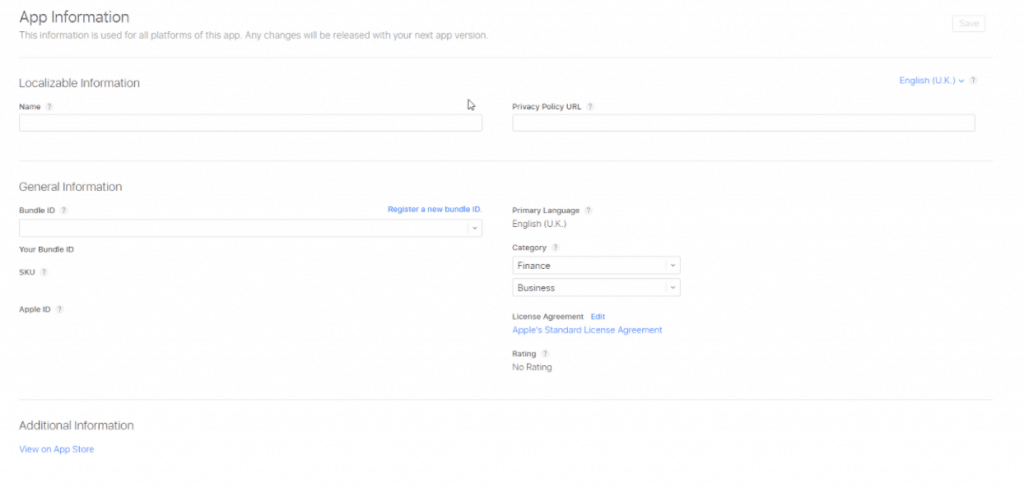
The details within the App Information section will be used across all devices that this app serves. Once your app is released, any changes you make to the App Information will be reflected in the next version of your app that you release.
Localizable Information
These are all of the details of your app that can be translated into languages other than your primary language.
Name
This is the name that the buyer/consumer/customer will see on the App Store page. Making your app name easy to spell and related to the functionality of the app means that you’ll have less to explain about the main features of your app. A good example of this is Snapchat.
Ensure your app name isn't longer than 50 characters. In fact, sometimes two short words are better than a single long word, as (from your testing) you'll know that the words wrap. Overall though, one short word is the best option for a name.
Privacy Policy URL
This URL links to your privacy policy. You may not think you need one if this is just a hobby or you're doing this for fun, and you may be right. But it all depends on your app's target audience and content.
If you have any of the following features, or target these audiences, you need a privacy policy:
- An app for children
- If you offer free subscriptions
- If you offer subscriptions that auto-renew
- You allow account registrations
- You access a user's existing account
If you collect user- or device-related data, you are only recommended to have a privacy policy.
Primary Localized Language
This setting is very important, however it's not subtitled, and your attention isn't really drawn to it as it is with other sections on this screen.
You can also set your primary localized languages here via a drop down.
General Information
Bundle ID
This is the ID that you used in Xcode. Be aware, it can't be changed after you upload your first build. So get it right!
You have the option to register a new ID or chose the iOS Wildcard App ID option. You usually use the wildcard option for apps that don't use app-specific functions like in-app purchasing or Game Center. You can read more about Wildcards App Ids in the Apple Developer library.
SKU
This is a unique identifier for your app. Don't worry, it's not visible on the Store so you can use any obscure ID you wish. Just make sure you keep a note of it if it's that unusual.
Getting into the habit of creating SKUs in a specific format is a good idea, so that even if it's not clear to someone outside of your team, you'll be able to look at your SKU ID and know what it relates to without looking it up. For example, you may choose to use the first three letters of your app name in capitals, and then maybe the date it was first released. It's really up to you.
Apple ID
This ID is automatically generated and assigned to your app. It's arbitrary, so don't try and make sense of it. But you may want to keep a note of it somewhere easily accessible. It'll save you logging back into the app store and going to this page in order to find it.
Languages
Primary Language
This is simply a read-only text field set by the localizable primary language you already set. I know it's confusing having language defined in two places, but it's the way this screen is laid out at the moment.
You need to set up the primary language in which the app will be used. Additionally, you have to set up the languages for which the app will be localized.
If your localized language isn't available, then the content served will be from the primary language.
If you can't find a supported language you would like to use, see the FAQ.
Category
Now you must define what category your app is best suited to.
What's the main function of your app? Does it provide entertainment, improve your productivity, or make it easy to keep up with the activities of your favourite charity?
You could try and classify your app in a category that you know is popular in the hopes of it getting discovered, but this kind of classification may mean that those looking in the correct category for your app will miss it. It's up to you to decide what's more important.
If you're not sure about what to choose or have other questions, you can see the App Store Category Definitions.
So, you're analysing your app to see which category will suit it best. But what if you think it could fit into more than one? Well, you're in luck. You have the option to assign a primary category and an optional secondary category.
The primary and secondary categories are currently as follows:
- Books
- Business
- Catalogs
- Education
- Entertainment
- Finance
- Food & Drink
- Games
- Health & Fitness
- Lifestyle
- Magazines & Newspapers
- Medical
- Music
- Navigation
- News
- Photo & Video
- Productivity
- Reference
- Shopping
- Social Networking
- Sports
- Stickers
- Travel
- Utilities
- Weather
License Agreement
Here you can set Apple's Standard License Agreement or edit it to best suit your project's or team's purpose. The License Agreement is in place to detail who has ownership of the product from the End User’s perspective, i.e., the person who downloads your app. This differs from the Privacy Policy, because in a privacy policy you as the developer define what you are doing with the information you gather through your app, in order to protect and enforce the rights of the users of your app. By contrast, the License Agreement arguably works more to protect the interests of the app developer.
Rating
An age rating is required, as it classifies the minimum age of the audience that can use your app. The age rating of the app is based on the most mature rating required across all devices.
The current list of age ratings that you can clarify your app under is as follows:
- No Rating
- 4+
- 9+
- 12+
- 17+
Additional Information
This section allows you to preview your app and see how the details you have set up will look on the App Store.
It’s a good idea to see how the settings you have chosen are depicted and positioned on the App Store page before it goes live. For example, it could be that when you preview it, details in an image you’ve taken look a lot smaller and are only visible when you open the full size image. This may not be good for catching the eyes of those just browsing for a new app on their smartphones.
If you find something that looks incorrect, you can always go back and update the details, even after you submit your app for review.
What’s your next step?
So, now you have been introduced to the Apple Developer Dashboard. You have a basic understanding of how to configure the App Information screen in the My Apps section in order to start building an attractive and informative App Store page.
So now what do you do with this initial knowledge of the App Store? Why not build upon it?
There are still two more screens left to populate with information before you submit your app for review.
In my next post, I'll share what information you need to supply on the next screens to build a great App Store page.

