As an Amazon Associate I earn from qualifying purchases.
 Hapi.js (also known as hapi) is an open-source framework for web applications. The most common use of hapi is to build web services such as JSON API. You can build application programming interface (API) servers, websites, and HTTP proxy applications with hapi.js.
Hapi simplified the way in which developers write highly scalable APIs. It is powerful and feature-rich framework with solid architecture. If you are new to hapi.js, I suggest you read my previous introduction article.
What Is a REST API?
A REST(Representational State Transfer) is an application program interface(API) that uses HTTP requests to GET, PUT, POST and DELETE data.
A RESTful API—also referred to as a RESTful web service—is based on representational state transfer (REST) technology, an architectural style and approach to communications often used in web services development.
Hapi provides some powerful features for building REST API. Some examples are Routing, Plugins, Logging, HTTP interface, Error Handling, etc.
You do not need to work with the raw Node.js HTTP library. Hapi encapsulates the request and response object of HTTP request. Hapi allows you to build REST API faster. Let me show you how you can create APIS in hapi.js and mongoose
Installing Hapi.js
First of all, I am going to show you how to install hapi.js. Open your terminal and run the below commands. Npm init will create a new package.json file in the root directory of your application. You can install hapi on your local machine by using the npm install command. Npm(Node Package Manager) will grab the hapi package from the repository and save it to your local node_modules folder.
npm init — yes
npm install — save hapi
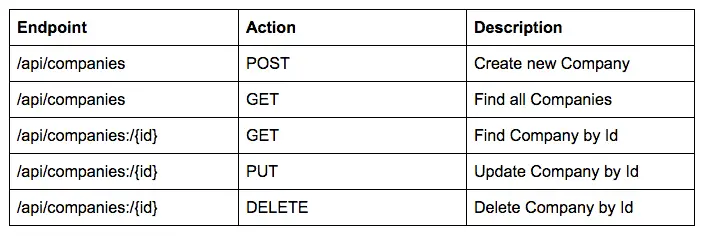
API Endpoints Overview
I will show you how to build pure CRUD (Create, Read, Update, Delete) API endpoints with hapi.js. I have used some HTTP verbs such as POST, GET, PUT, and, DELETE.
- POST is used to create new records in the database
- GET request is used to fetch records from the endpoints
- PUT is used to update the record
- DELETE is used to delete the record with MongoDB
Creating a New Server
First of all, we need to create a new local server in hapi.js. Hapi allows you to create a new instance of the server from the hapi.Server() method. You can configure hapi server on a local machine by providing the host and port configuration. You must start the server by using the server.start method. If something goes wrong while starting the server it will throw this error:
Run the Hapi Application
You can run hapi application on your local machine by executing this command:
node server.js
If the server started successfully, then you will see this message on your terminal or command prompt: Server Running at PORT 3000
Connecting Hapi App to MongoDB
I am going to use MongoDB database to store my company’s record. MongoDB is a free and open source cross-platform document-oriented database program. Npm provides an excellent mongoose plugin to interact with MongoDB. Mongoose (Object Document Mapper) is wrapper around the MongoDB.I will use Mongoose ODM to connect hapi application to MongoDB.You have to install mongoose package from the npm (Node Package Manager) repository.
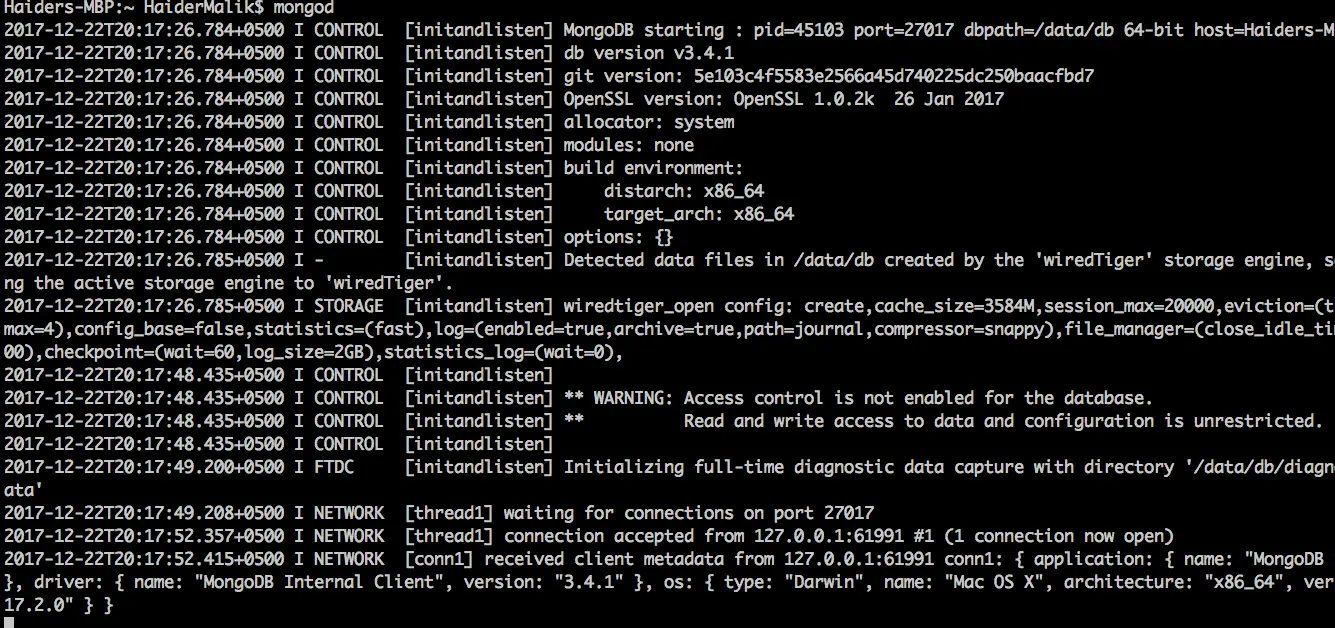
Running the MongoDB
Open your terminal and execute the mongod command, which will start the MongoDB server on your machine:
mongod
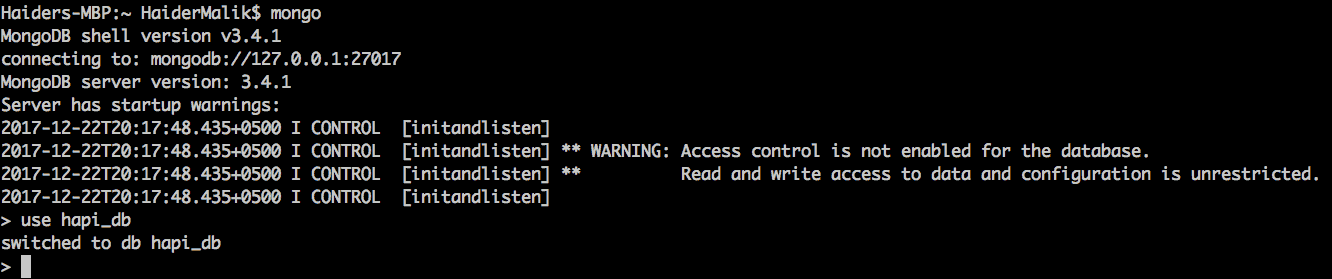
Creating a New database
I will save all of my company’s data in the hapi_db database, but we have not created a database yet. To get started, open another tab in your terminal and execute this command:
mongo .
It will start the mongo shell on your machine, which allows you to run the MongoDB statements.
Now you need to create the new database by running this command:
use hapi_db
It will create the hapi_db in your MongoDB database. You can see the output of the MongoDB server below.
Connecting to Mongoose
I am going to use mongoose to interact with MongoDB. Mongoose allows you to define your native MongoDB collection in Javascript object. You can also add validations to the model with the help of Mongoose.
Mongoose.connection is inherited from the nodejs EventEmitter class. I have registered a listener for the connected event. Nodejs will call the connected listener when the application is successfully connected to MongoDB.
Server.connection is used to configure your host and port for hapi application. I have set the host to localhost and port to 3000. You can choose any port number, like 4000 or 8080.
Server.route is used to create a route in hapi.js. It will take a configuration object which must have path, method, and handler property. I have also registered an error listener for error events. Hapi will emit the error listener if it occurred while connecting to
MongoDB. reply method is used to send the response back to the user.
Creating a New Model
Everything in Mongoose starts with a Schema. Each schema maps to a MongoDB collection and defines the shape of the documents within that collection. The instance of the models represents the MongoDB document.
You need to develop a new models directory in the project root directory. You also have to build a new model inside the model’s folder I am going to choose the company.model.js filename.

I have created a new CompanySchema to save the company records in MongoDB database. The schema represents the Collection in MongoDB. Mongoose.model represents the instance of the document in MongoDB. I have exported the instance of the model because I need to use this company model for other javascript (Controller) files.
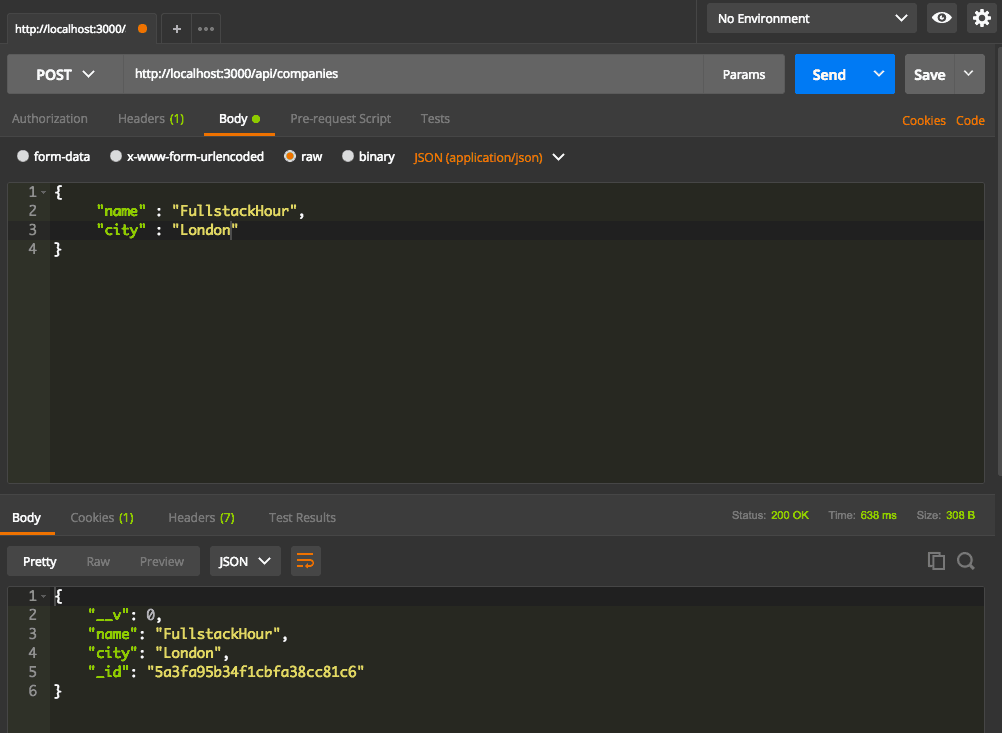
Adding Record in MongoDB
Now I want to show you how to create a new company in MongoDB. I have created a new route with the /api/companies path. You have to send the HTTP POST request from the Postman. I will use Postman to send the request.
You can access request params from the req.payload object. I got the name and city of the payload object and also added required validation for the req.payload.name field. If the user does not provide the name while creating a new company, it will send the validation error in the response.
I have invoked the create method from the mongoose Company model. You can also send the error to the response by using the reply method.
If you send the request from postman to http://localhost:3000/api/companies, you will see the 200 status code in the response. The 200 status code means that the request has been executed successfully.
Find All Records
We can also get all of the records from the company model. I am going to define the GET HTTP request endpoint to get all of the companies. You just need to send the HTTP GET request to this endpoint /api/companies.

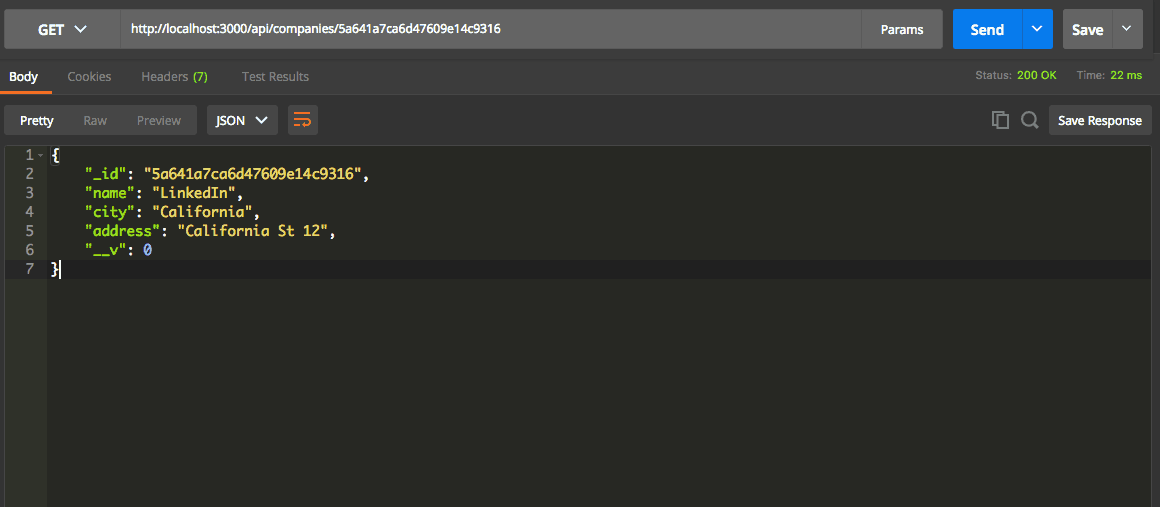
Find a Single Record
The mongoose model class also provides the findById method for accessing a single record from the database. I am going to create a new endpoint to find a single company based on id. The path of this endpoint should be /api/companies/{id}. I will send the company id dynamically from the postman.
I have used the findById method to get a single company from MongoDB. If something goes wrong while fetching a record from the database, then you will receive 404 (Bad Request) error. If there is no error in the response, then you will get the single Company in the reply.
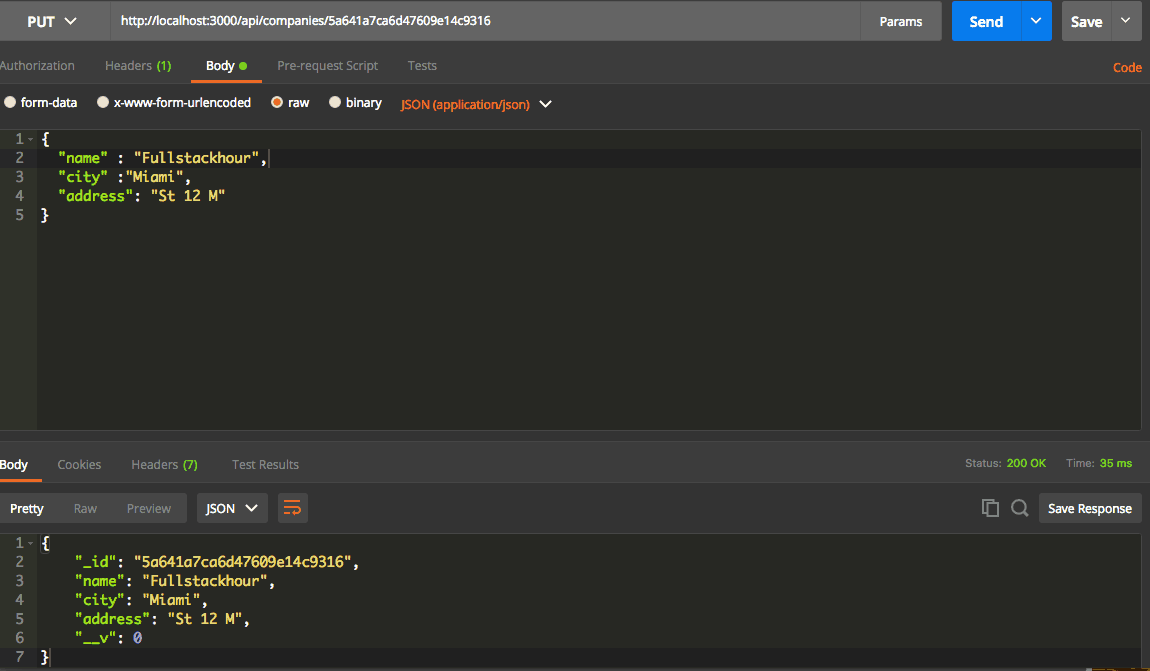
Update Records
You can also update the company records in the database. I’ll show you how to update a company by Id. You can use the findByIdAndUpdate method to update the record in MongoDB.
It will take four arguments: the first parameter is the id of the company which you want to upgrade, the second argument is the record to update object, and the third variable is the object with new property and the final argument you need to specify the callback function.
If the company does not update successfully, you will get a server error with the 500 (Server Error) status code. If MongoDB updates the company successfully, you will receive the updated record of the company.
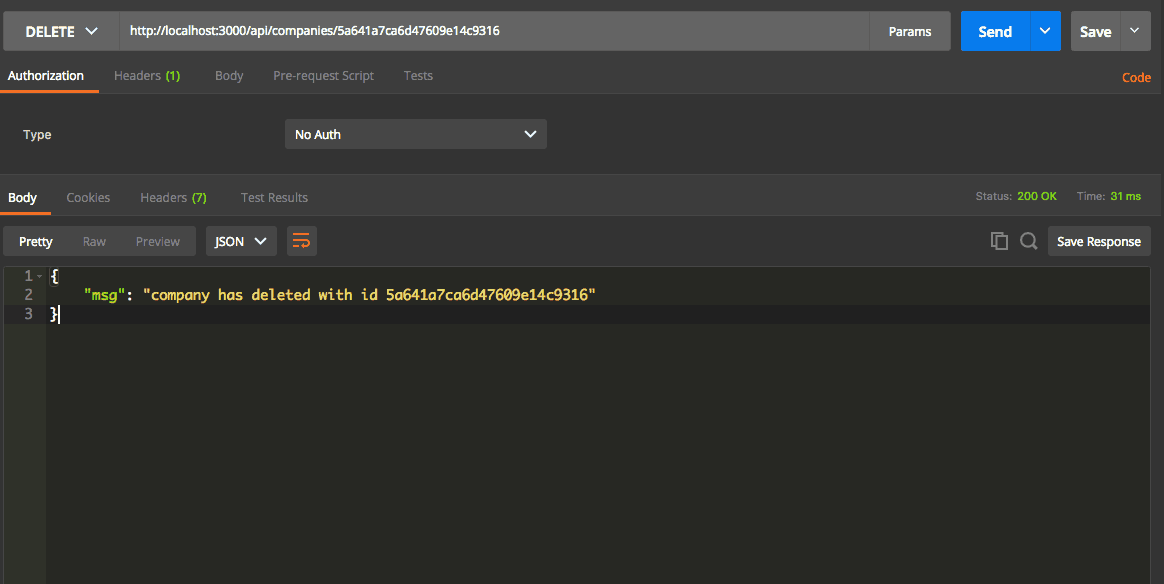
Delete Record
If you want to remove any company, you will have to send the delete request to this URL http://localhost:3000/api/companies/{id}. You have to provide this {id} dynamically from the Postman.
I am going to use the findByIdAndRemove method to destroy the company from the database. You just need to specify two arguments in this function. The first parameter should be the id of your company, and the second variable should be the callback function.
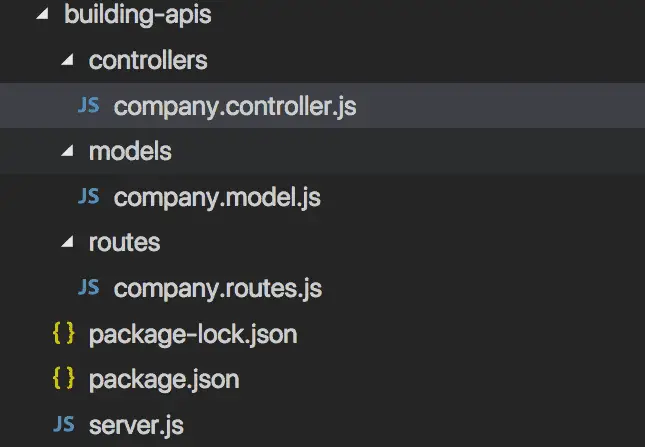
Refactoring the Application File Structure
I placed all my source code in a single file, which is the server.js file. If you are working on a large project, you must create a better file structure to organize your source code files.
I am going to use some MVC(Model View Controller) design patterns for my file structure. I will place all my route actions or request handlers in my controller.js file and also have a separate file for defining routes. I am going to place all my mongoose models in the models directory.
If you want to register a new endpoint in this application, you will need to add a new route in the routes.js file and add route action handler in the controller file. You can see the exact file structure in the below diagram.
Creating a New Company Controller
The Controller class is responsible for the following processing stages:
- Locating the appropriate action method to call and validating that it can be called.
- Getting the values to use as the action method’s arguments.
- Handling all errors that might occur during the execution of the action method.
Now I will show you my company controller file. You can refactor your company.controller file by copying the code from this file.
Creating New Company Routes
Each route has a request handler or action method. We will place the application logic in the controller file. I will define my company related endpoints in company.routes.js. I already mentioned that you should have a separate route file for each controller. I have also applied SRP (Single Responsibility Pattern). Each file should have a single responsibility. Let’s look at the code in the company.routes.js file.
Mastering Hapi.js to Build Scalable APIs
You have learned how to build CRUD (Create, Read, Update, DELETE) Restful API in hapi.js. Now you are able to integrate hapi to MongoDB.
I have also showed you some of the best practices for maintaining folder structure in hapi.js. In the next article, I will show you how to add validations in Hapi.js. You can download the complete source code for the building apis module.
Good Code Isn’t What Gets You Paid
The developers landing the senior roles and the consulting offers aren’t better engineers than you. They’re known. RDU is John’s coaching program for developers who are done being the best-kept secret on the team.
Book Your Free Call →
Related Articles

12 REALITIES of Daily Life as a Programmer
What’s the daily life of a programmer like? A programmer’s daily life consists of auditing and debugging code, coding new…

5G App Development: How To Prepare for the Future of the Internet
5G is the fifth generation of broadband cellular mobile networks and is expected to bring a huge change in the…

Impostor Syndrome as a Programmer
Believing that you’re somewhat unqualified for your job is a problem faced by the best of us. When those thoughts…