As an Amazon Associate I earn from qualifying purchases.
 There’s a journey happening right now as more and more organizations migrate to cloud platforms.
According to Right Scale’s February 2017 “State of the Cloud” survey, 79 percent of organizations now have systems running in either public or private cloud infrastructure and 95 percent are going to pursue cloud adoption.
Astute programmers have recognized the shift and have already begun their trek towards cloud proficiency.
As a programmer, you can see the wagons loading up and heading out. Will you be in the lead on this journey? Don’t dig in your heels and get left behind in a lonely ghost town. Don’t make the 5 Learning Mistakes Software Developers Make.
Saddle up! It’s time to become a Cloud Computing Pioneer.
Like any pioneer looking at the wilderness in front of them, knowing the right trail to take is critical.
The AWS Developer Tools Map
Amazon Web Services Developer tools consist of two main territories: CodeCommit and CodeBuild. Each territory focuses on a specific development area, including source code management and build automation. Together, these tools deliver you to your destination of a mature development platform, fully integrated with your systems infrastructure.
Briefly, let’s cover the concepts of the two developer tools. Afterwards, we’ll explore both in more detail by walking through several hands-on exercises to set up and use each one in your own little micro-project, the “Wheel of Lunch!” This basic application will demonstrate each component of the AWS Developer Tools suite.
In the end, you will have a basic understanding of what both tools do and how to make use of them. You will be ready to strike out on your own for undiscovered country and leverage these tools in your own development projects.
CodeCommit
Source code management is always the first leg on any journey to a mature development destination because without a solid footing of stable source code you’re treading on quicksand. Source code that is not well managed can drag you down into a pit of troubleshooting and firefighting that kills forward momentum — and can kill a project altogether. The AWS developer tool that helps you stay out of the quicksand is AWS CodeCommit.
AWS CodeCommit is built on the familiar git source control management platform. So, if you are already familiar with git and git practices, you can leverage that knowledge to get off to a running start with CodeCommit. If you are unfamiliar with git, there are plenty of git resources and tutorials to help you get started.
If you work in a team environment, CodeCommit can be configured for multiple team members to work from the same repository. Depending on the complexity of your team, you can either configure approval levels in CodeCommit or rely on adherence to procedure to govern which commits reach the main trunk of your code that will eventually enter production.
On top of git functionality, CodeCommit allows you to integrate with the next territory on the map, CodeBuild. With a single commit to your repository, it becomes possible to build, package a deployment change for a QA environment for manual testing, and then deploy to your production environment.
CodeBuild
Every good wagon train has them. The severely critical, detail-oriented, “my way or the highway” trail boss who won’t be happy until every detail has been scrutinized, every strap buckled, and every wheel tightened before the journey even begins.
CodeBuild is that trail boss but in automated form; it makes sure your code is truly ready for primetime. When you integrate CodeBuild into your software delivery pipeline, you are inviting a relentless machine to pick apart your code, look for deficiencies, and provide you with a list of just how poor your code quality is. For this critical analysis, you are undyingly grateful.
This relentless evaluation of each commit to your repository ensures your code is up to the performance, architectural, and regression standards needed for a successful release. In days gone by, this analysis was done with peer reviews and manual testing, which took far longer and was prone to error.
With CodeBuild, every step is automated. Each build is carried out exactly as instructed and just like the build before. All of this process happens in a fraction of the time that rounds of manual review used to take. No chance that a peer is tired and has missed something. An exact result is produced every time.
Continuous integration of builds means more issues are discovered before any manual review or testing takes place. Issues found in this stage are far less costly to correct than errors found during manual testing or, worse yet, after release to production. A clean build of your code after every commit means you can be confident your code is ready for production.
Developer Tools, Step by Step
You’ve surveyed the map, but before you set off, you need a trip to the AWS general store to get provisioned for this trip.
You will need an AWS account to get started. Fortunately, for first time, AWS offers Amazon customers a free tier of usage for your first twelve months with the service. It’s enough capacity to cover everything we’re going to talk about in this article and explore a bit more on your own.
Setting Up Your AWS Account
The AWS console is your starting point for all things Amazon Web Services related. Head over to http://aws.amazon.com and click on the “Create an AWS Account” button which takes you to the account registration screen.
Fill out the forms and click the “Create Account and Continue” button when you are ready to proceed.
Even though you are going to be using the 12-month free tier, you will need to enter a payment option to proceed. Amazon will only bill this card if you exceed your free usage threshold.
You will be presented with a screen to provide a phone number and verify that you are human and not a bot. Once you put in your information, you will receive a phone call with a PIN; look for the notification on the screen and enter the PIN.
After that, you will see a welcome banner and be prompted to sign into the AWS console.
Enter the email address you used to create your account, then enter the password you used when you created the account.
Congratulations! Your supplies are bought. Your wagon is loaded. It’s time to roll out and start using AWS.
You’re heading for the first marker along the trail. It is a destination called CodeCommit. Let’s take the path turn by turn to get you there.
Setting Up CodeCommit
In the “AWS services” search box, enter CodeCommit and click on the selection that appears.
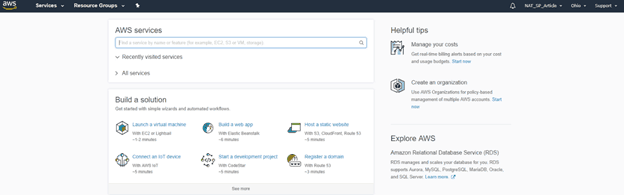
You’re now at the CodeCommit console, where you should click the “Get started” button.
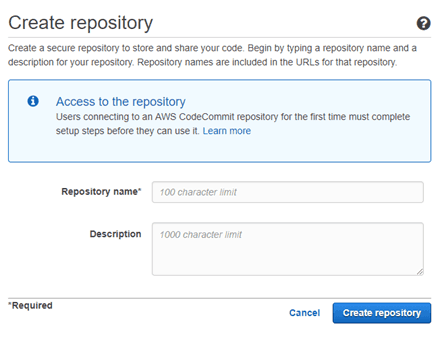
You will need to enter a repository name and an optional description for the repository. Once you’ve entered those, click the “Create repository” button.
You will be asked if you want to be notified via email of events and any comments on your repository. If you have a team of developers working together, this option can improve communication to be notified of changes in source code as they are pushed to the server.
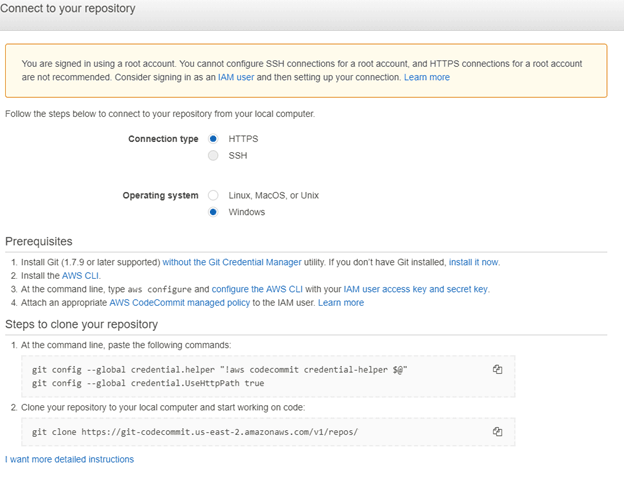
AWS will complete the creation of your repository and present you with a pop-up that contains information on security and connecting to your CodeCommit repository. The danger it is warning you of is worthy to note.
It is explaining that the account you are using has full control over all of your AWS account. If it were to be compromised, bandits could make off with all the donations your wagon train is hauling west for the orphans in the Nevada territories. We will be addressing this concern a little later on.
If you don’t have Git installed, you must install it before proceeding (https://git-for-windows.github.io/). Because of the distributed nature of Git, every computer running Git is a fully sufficient and independent node in your repository network. Full recovery of your Git repository is possible as long as any one node remains intact, which means it is necessary to install Git on your local machine to enable it to become a node in the network.
You will also need to install the AWS Command Line Interface, CLI. Select either the 64-bit or the 32-bit operating system installer.
Before you can complete the setup and clone the repository, you will need to create an account, called an IAM User, with lower permission levels than the root account you created and logged in with when you set up AWS. This account will allow you to connect to your CodeCommit repository over an HTTPS connection and not worry that if that connection is compromised an attacker will have access to your root level account.
Create an IAM User
Time to get your hands dirty. You’re at the foot of the pass, heading into mountain territory. The concepts you’ll be working with next go beyond your experience with non-cloud development. You may feel the hairs on the back of your neck prick up and ask yourself, “Are there bears here? What about mountain lions?”
There’s nothing that will eat you on this trail, but the footing is a little tricky. Not to worry, I’m here to guide you. If you follow my lead, you’ll make it through unharmed, wiser, and with tales to tell your grandchildren.
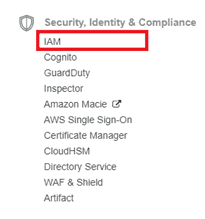
From the services drop-down menu in the “Security, Identity & Compliance” section, click the IAM link.
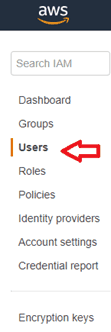
In the IAM navigation panel, click the “Users” link.
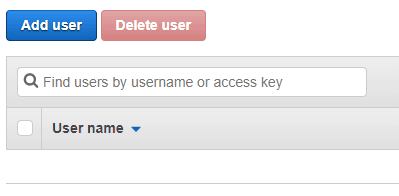
Click the “Add User” button.
Enter a name for your user.

Make sure the “Programmatic Access” checkbox is selected.

Click the “Next: Permissions” button.
Let’s grant our user permissions to CodeCommit. If your team is large or team members come and go, another option is to set up a developers group and grant it permissions to CodeCommit. You can then add and remove users from the group as needed. For this exercise, granting permissions directly to the user will be sufficient.
Select the “Attach existing policies directly” option. Type “CodeCommit” in the search text box.
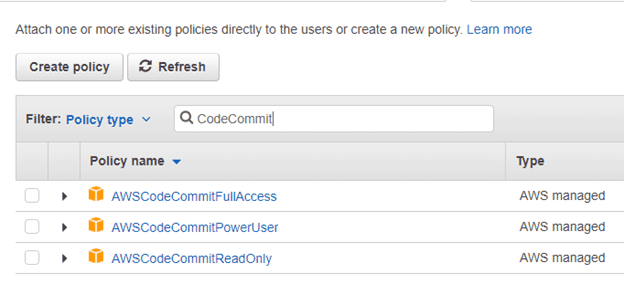
Select the “AWSCodeCommitFullAccess” policy and click the “Next: Review” button.
Confirm everything meets your expectations and click the “Create user” button.
You will be presented with an option to download the user’s security credentials as a CSV file. Go ahead and click the “Download .csv” button and store the file in a safe location.
You now need to configure your AWS CLI to store your IAM credentials. Launch a command prompt and type “aws configure” to launch the AWS CLI configuration.
Enter the AWS access key ID you downloaded in the .csv file for the IAM user you created.
![]()
Enter the Secret Access key.

Accept the default Region and output format.
Now you are ready to clone your repository to your local computer. As discussed previously, Git is a distributed system of nodes. Cloning the repository makes your local computer the second node in the repository and a complete backup to the first node, the CodeCommit repository on Amazon’s cloud.
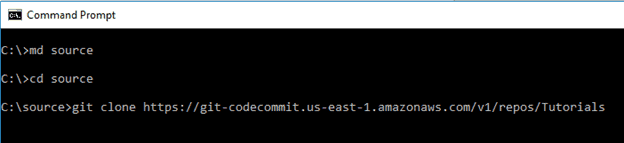
To start the cloning process, create a directory that you would like to use to store your source code in.
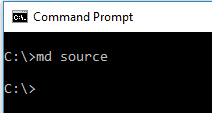
Step down from your root directory to the directory you just created. Git actions are relative to the directory you are working in, so changing to the new directory is important to prevent unintended changes in the root directory.
In your CodeCommit repository, click on the “Connect to repository” link to display your connection information. Copy the URL from the git clone command to your clipboard.
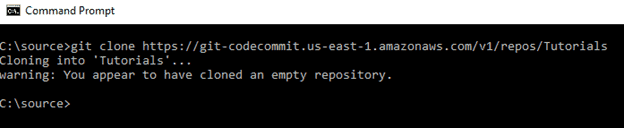
Type ‘git clone’ followed by the URL you copied at the command prompt.
This action will create a local git repository connected to your AWS CodeCommit repository.
You will be prompted to log in with your git username and password. Enter those credentials from your IAM user.
Once the clone operation is complete, you will receive a message that you’ve cloned an empty repository.
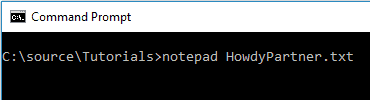
We will get to a coding example shortly. For now, let’s start with a simple text file to demonstrate that CodeCommit is working.
Change to the subdirectory Git created in your folder.
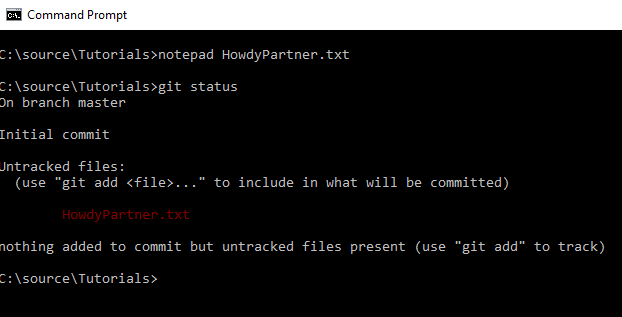
Type “notepad HowdyPartner.txt” at the command prompt
You’ll receive a message that the file doesn’t exist. You will be asked if you want to create a new file. Choose “yes.”
You’ll now be in the Notepad application. Type, “Hi! How are you doing?” or your preferred text into Notepad, save, and close the file.
Back at the command prompt, type “git status”. You will receive a message indicating you have new files ready to be staged and committed.
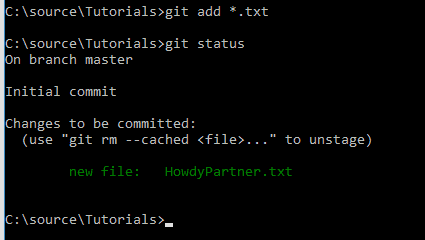
You need to stage the files by typing “git add *.txt” at the command prompt. Typing “git status” again will show your file staged and ready to be committed.
Commit the file by typing “git commit -m ‘Adding HowdPartner.txt’ to git repository”

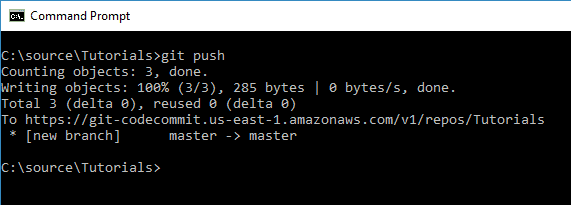
At this point, your new file lives in the local Git repository on your computer. To sync it to the repository in the cloud on CodeCommit, you need to issue a push command. Type “git push” at the command prompt.
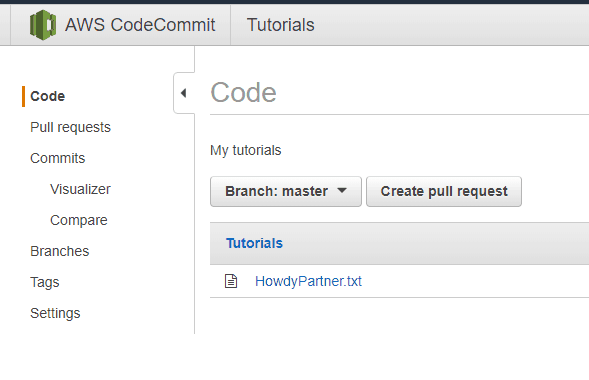
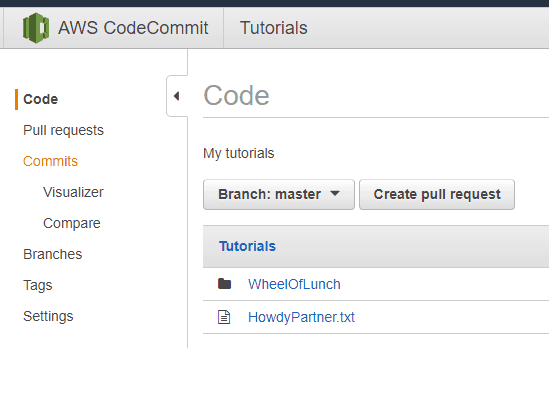
Now you have a copy of your file in the cloud on CodeCommit. Refresh your repository screen in the CodeCommit console to see your new file.
You now have the first building block in your developer tool pipeline in place. From here, the next step is integrating your CodeCommit repository with automated builds and testing with CodeBuild.
Setting Up CodeBuild
You’ve found your way through some tough country at this point. You’ve earned some calluses and trail wisdom. You’re nearing the trail’s end, but you have to be careful. Now that you are on the downhill side, you can’t afford to get complacent. A wrong turn will leave you snowed in on the mountain without sufficient food to survive the winter.
CodeBuild is the tool to that will make sure you keep your wits about you. Its purpose is to systematize discipline so that when you’re tired or in a hurry, you don’t miss something critical in the process.
To fully understand what CodeBuild is capable of, you need a coding project to work with. We’ll be using my example project “Wheel of Lunch!” It’s a .Net Core console application, so it runs on both Windows and Unix operating systems. No coding required for this exercise; you can download the full .Net Core tutorial project to be up and running right away.
Download the files and place them in your CodeCommit directory on your local computer. You’ll need to backtrack a little and retrace your steps. Repeat the steps above to add, commit, and push these files to Git. Now when you refresh your CodeCommit repository console, you will see these new files ready to go.
Now you are ready to set up an automated build with CodeBuild.
Before setting up a build with CodeBuild, we will need a location to store the artifacts output from the build to be used later on when you are ready to deploy your application. We will use S3, Simple Storage Service. S3 storage containers are called buckets. Let’s quickly set up a bucket for CodeBuild to use.
Setting up S3 Buckets
From the AWS services drop-down menu, select S3.
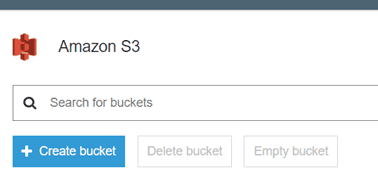
We will name our bucket “build_output”. Click the “Create bucket” button to get started.
Enter a unique bucket name. This name must be unique to all S3 buckets anywhere, not just your account, because this name will be used as part of the URL used to access this bucket.

Click the “Next” button.
Accept the default settings and click the “Next” button again for the “Set Properties” and “Set Permissions” screens. Review everything to confirm it meets your expectations and click the “Create bucket” button.
You will be shown your new bucket in the S3 console. Now you can proceed with creating your build definition in CodeBuild.
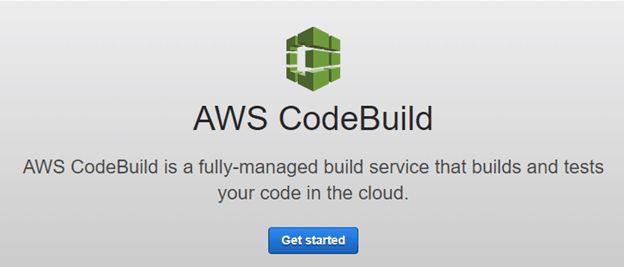
Back to CodeBuild
From the services drop-down menu in the AWS console, select CodeBuild.
Click the “Get started” button.
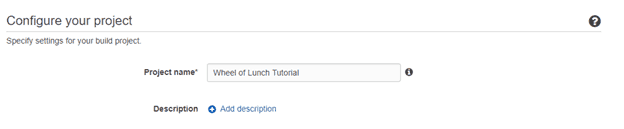
Give your CodeBuild project a name.
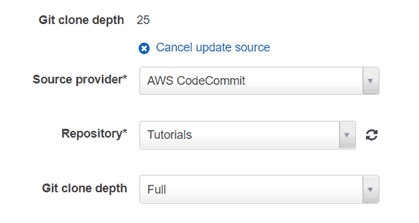
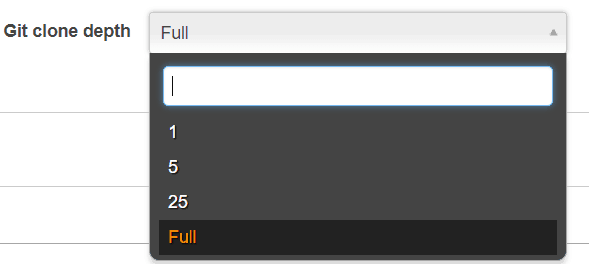
Now you’re ready to tell CodeBuild what you want to build. The information in the screenshot below indicates that the source code we want to build is housed in CodeCommit in the tutorials repository. Selecting a clone depth of “Full” ensures that all files in the repository are made available to the build, avoiding any missing dependencies.
Next, we’ll specify the environment that we want CodeBuild to use. Select the “Use an image managed by AWS CodeBuild” radio button. Select the appropriate Operating System from the drop-down box (Ubuntu). Specify the Runtime as .NET Core and the Runtime version as dot-net-core-2.0.
In the source code files for the project, I have included a build specification file, buildspec.yml, that includes the instructions to CodeBuild on which project to build. To make use of this file, make sure the “Use the buildspec.yml file in the source code root directory” is selected.

In the next section, we specify that we want the artifacts that the build produces to be placed in the S3 bucket we created above.
In the “Artifacts” section, select “Amazon S3” from the Type drop-down menu.

In the remaining boxes, enter values appropriate to your liking.

In the “Bucket name” drop-down, select the first bucket you created in S3. Click the “Update” button to save your changes.
Now when your build runs, it will copy the artifacts, like executables and library files, to the S3 bucket.
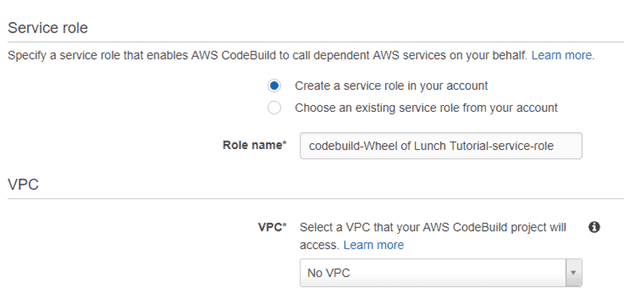
We will need a Service Role to execute this build. Select the “Create a service role in your account” radio button. Enter a name for your role in the “Role name” text box.
We will not be using a Virtual Private Cloud (VPC) for this example. Select “No VPC” from the dropdown box.
Click the “Continue” button, then review your build configuration and click the “Save” button.
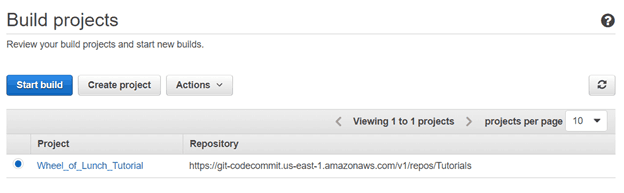
You now have a fully defined build pointing to your CodeCommit repository that will extract and build your code for you. To launch your build, select it from your CodeBuild “Build Projects” console.
Click the “Start Build” button to trigger the build. This action will display the “Start new build” screen. Select the “master” branch from the “Branch” drop-down menu.
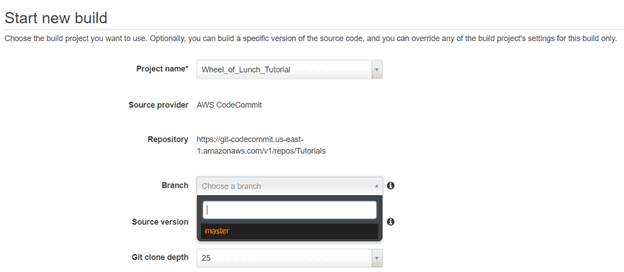
From the “Git clone depth” drop-down, make sure the option “Full” is selected. This selection will retrieve the entire repository to make sure no critical files are missing that the build will need to in order to succeed.
Click the “Start build” button to launch your build definition. The build will run. When it completes, you will see a report on the end result.
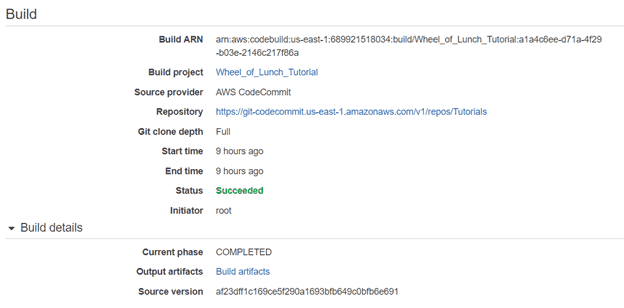
The status row should indicate “Succeeded.” If you have a different result, the log files provided below this report should tell you what failed.
In the details section, the label “Output artifacts” is beside a link to the S3 repository where these artifacts have been stored. You can click on it to see the result of your efforts.
With this output, you can deploy and test your code. When it passes all tests and meets quality standards, it is ready for production deployment.
Next Steps
You’ve made it! Across the plains and over the mountains, you’ve arrived at your new homestead or gold claim or orphanage. With cloud computing, the possibilities are too many to count.
You’ve survived the journey and mastered new skills that will serve you well in your new endeavors.
With CodeCommit, you ensure your source code is well managed and controlled. A complete version history is available to you, and the powerful branching capabilities of Git are at your fingertips.
CodeBuild enables you to build and validate the production readiness of your source code. As soon as your code is committed to your CodeCommit repository, it becomes available for CodeBuild to put it through its paces.
All of these tools barely scratch the surface of the services AWS has to offer. From voice and image recognition via AI to cloud-based Relational and NoSQL databases, it’s difficult to name a technology that’s not available in some form from AWS.
There’s a lot of horsepower within the developer tools offered by AWS. Getting comfortable and capable with them is a valuable skill for you as a programmer.
If you are interested in more AWS topics and are looking for a good starting point to get introduced to the essential concepts, a good place to start is this AWS Essentials page or Amazon Web Services in Action. If you want a strategy on how to learn the technology of AWS as fast as possible, the video How to Learn a NEW Programming Language FAST! shows you how.
Now, get out there and commit to building something great with CodeCommit and CodeBuild!
Good Code Isn’t What Gets You Paid
The developers landing the senior roles and the consulting offers aren’t better engineers than you. They’re known. RDU is John’s coaching program for developers who are done being the best-kept secret on the team.
Book Your Free Call →
Related Articles

How to Become a GREAT Software Engineer (Without a Degree?)
If you’re thinking of becoming a software engineer (or developer – they’re very similar, as we’ll talk about below) ……

Best Practices for Mobile UX Designs
As per a report compiled by Statista in 2021, the number of mobile users worldwide stood at 7.1 billion. It…
The Programmer’s Guide to Health & Well-Being in Challenging Times
Staying physically and emotionally healthy during challenging times is never easy. And it’s safe to say that the past few…