 Learning new skills is how we as programmers stay sharp and stay employable. I recently started a gig that gave me an opportunity to learn something new, but I had to develop a few workarounds to learn a new framework and make it do what I needed it to do.
Boilerplate code can help jump-start a project. You can find these starter packages for a variety of different languages and frameworks; they provide many common features of applications and websites, for example, login pages, database connections, and menu structures.
In fact, these packages are fully functional on their own. You, as a developer, just need to build them out to your specifications.
Another great use of these boilerplate code templates is when you are learning a new framework. They provide real-world working examples. However, they usually have a downfall: They can be too basic.
A popular backend JavaScript framework, MeteorJS (Meteor), recently decided to expand its front-end templating frameworks to include ReactJS (React) and Angular. This was a huge and welcoming change. React is one of the more popular front-end frameworks. It was also a great framework for my new gig, so it was high time that I broadened my skill set by learning this new JavaScript framework.
To help start my learning, I turned to a great resource for Meteor called TheMeteorChef.com. This group published a boilerplate for Meteor/React projects called Pup. It is a great starter application, but like most boilerplate code bases, the interactivity that I needed my application to have wasn’t built in. I had to expand my knowledge of React so that I could satisfy all stakeholders in this project.
I was lucky enough to not only land this gig, but it was small enough that I was able to choose the technology stack. I’ve been developing in Meteor for over a year and have come to really like how quick a working prototype can be up and running. So I jumped at the chance to do this project in Meteor and its new support of React.
Let me tell you how I went about making React’s presentational, or “dumb” components, into React’s “smart” components so that my project would succeed.
The Difference Between “Smart” and “Dumb” Components
It’s a lot easier to understand what dumb and smart React components are when referring to these unofficial descriptive names.
Dumb components are how your application presents HTML. They’re how your website looks. You feed them some data (via props) and they spit out that formatted data to the browser. They’re not very smart. They’re a one-trick pony. They do their job and go away.
Smart components, on the other hand, are what make your application work. Not only do smart components accept data (via props as well) like dumb components, they also monitor and capture any change in data that has been initiated by the end user.
The real-time monitoring that React would capture includes, for example, updates in an admin section, a change to the product quantity in a shopping cart, or even just clicking on a drop down description box. You use smart components to update databases, keep track of the state of objects, and bind actions to one another.
The following is a very basic, or dumb, component that takes in a value (via props) as an object that contains the year, which is then output in the HTML code. Nothing extraordinary here. It’s a good old-fashioned function.
You might recognize this same functionality in the older, although still valid, ES5 JavaScript syntax:
Just because a component is dumb, doesn’t mean it can’t be complex. Here’s an example that not only spits out data fed to it, but it can loop over database records, calculate values, and provide a very slick and functional application. But it is not smart.
Breaking Down Complex Dumb Components
So let’s walk through this dumb component and see how it’s more complex than the previous example. Just because it’s a dumb component, doesn’t mean that it’s not useful. Far from it.
This is a prime example of a product page: a list of product attributes retrieved from a database. Now instead of some “smart” interactivity, this type of output would usually link to a product description page where one could actually place the product in a shopping cart, for example.
It’s just a basic function that is fed some data (the ‘loading’ and ‘images’ objects) and returns some formatted HTML to the browser’s Document Object Model (DOM), which the end user sees.
The name of this function is ‘Output’ and the values within the ‘loading’ (typically a Boolean), ‘images’ (an array of objects), and counter (a number) objects are passed to the function so that they can be placed in the HTML that is returned. Collectively, these inputs are referred to as ‘props’ in the React framework vernacular. This is the ES6 syntax for a function, sometimes called a “fat arrow function.” In the old way of ES5, it would be written as:
The first parameter being passed into the function is the ‘loading’ object. This is a pretty common design pattern. As your application is loading this view, or page, it’s making an asynchronous call to the database to fetch all of the image data and package it up in a nice array of objects.
This page/view/component is also retrieving all of the images and other elements to display on the page. While this action is happening, ‘loading=true’, which tells your application that it doesn’t have all of the necessary building blocks of your current page/view/component.
Therefore, display a spinner until it has all of the information, at which point the ‘Loading Component’ (<Loading />) changes the value of ‘loading’ from true to false (it’s up to you to determine if you should use a percentage progress bar or a plain spinner).
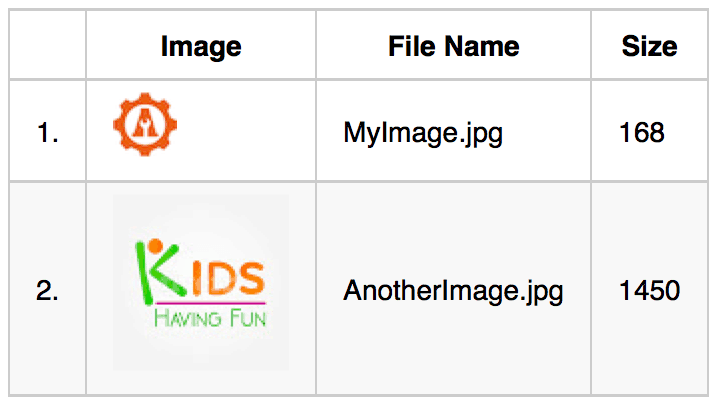
The second parameter, or prop, passed to the function is the ‘images’ object, which, as noted, is an array of objects that was returned from the database. These could be products, comments, blog posts, or any list of items that have the same data structure. Let’s check out what this data might look like.
Retrieving and Displaying Database Records
Each object contains a unique database record identifier (_id), a name for the image file (fileName), the size of the image, in bytes (size), and the Universal Resource Identifier (URI) where the image can be accessed over the internet (src).
Those are two objects containing individual image data. It’s probably coming from a database call in a different function, which will take all of the resultant database objects and “group” them into an array, which is then passed into our ‘Output’ function.
Or you could create the array manually. You’ll see manually created database objects in many boilerplate frameworks, because their creators don’t hook up a database and provide filler data for various, albeit in my opinion, bogus, reasons. This shortcut can be very frustrating when you are trying to learn a new language or framework.
So, if you see something like the code below, it’s usually because there’s no database connected.
Both results provide the function of an array looking like this:
If you wanted to access each database record, or object, you could call each like:
 The third prop passing to the ‘Output’ function is ‘counter’. This prop is just a number, in this case, a zero. There are other, more elegant ways to count the iterations of a loop, but for illustrative purposes, it is included so that I can show how a dumb component can still do advanced procedures.
So now we know what data to expect when the function is called and its output returned and rendered by the DOM. When we refactor this dumb component into a smart container, we’ll use the same data, but enhance what the component can do as well as what the component allows the end user to accomplish with a better User Experience (UX).
Now that the function has the data, let’s use the ‘loading’ variable and see if we should show the HTML output or the spinner. This is an if-else shorthand statement in the form of:
condition ? if true do this : if false do this
x == 2 ? ‘Yes’ : ‘No’;
We’ll read it as: “not loading,” is this true or false?
This syntax might make a bit more sense in the more verbose ES5 syntax: If the database has returned the dataset, show it; otherwise, show the spinner.
Dumb Output
So now that the function has some parameters to work with, let’s start to construct the HTML (or in this case, JSX, React’s XML preprocessor to JavaScript) to output to the DOM for rendering. If we can understand how this dumb output works, our process for converting to a smart container will be much easier.
The code has some basic Bootstrap ‘<table>’ tags (actually, the table is a ReactJS component, as identified by the capitalized word). Then common HTML ‘<tr>’ and header tags ‘<th>Original File Name</th>’, etc.
Then comes the database output. This code is pretty typical and not unique to React; it just outputs one database record per row. There are many ways in the older ES5 JavaScript syntax to iterate through a set of database records (‘for’, ‘while’ etc.), but in ES6, we use the ‘map()’ method.
This section of code is pretty important for this function. It tells the JavaScript engine in your browser that you are going to loop over a set of database records. The outermost curly-brackets ‘{}’ denote that this is dynamic code.
Let’s take the ‘images’ object that was passed into our function and deconstruct it—we are going to pull out the individual data points (_id, fileName, size, src) from each object (imageObject1, imageObject2, etc.) in the array. We can then use these as output in the HTML/JSX.
This dynamic ‘<tr>’ block within the ‘map()’ method will be output to the DOM once for every record returned from that database within the result set ‘images’.

That’s Great, But You Can’t Interact With It (It’s Dumb)
Now that we fully understand what this dumb component does, let’s think for a moment about what it doesn’t do.
Why do we output a simple table with rows and columns? To convey information, right?
Think baseball scores; stock equity data; warehouse inventory. Now, how often do we just ingest that data? Don’t we want to watch that game? Trade that stock? Update the inventory with a new shipment?
Most of the time, you’d like to offer CRUD (Create, Read, Update, Delete) methods for each row so that end users can interact with the data. Today’s technologies allow end users the ability to be more productive, and web technologies are no different.
Ten years ago, all of the interactivity had to take place on the server, so you’d click a product from a list, and that would tell the server to send a product detail page to the browser where the user could then put the product in their shopping cart. Modern web technologies have the ability to go to the product detail page like before, but now we can also just add it to the shopping cart right from the listing page. That’s more complex, and smart.
Let’s Make This Component Smart!
I needed to have my rows of image data to be acted upon by the end user. Rows would need to be deletable, but there is also a date field that the user could alter.
Here’s a screenshot of the User Interface (UI). There’s a simple Delete button that upon clicking, will, obviously, delete the row from the database.
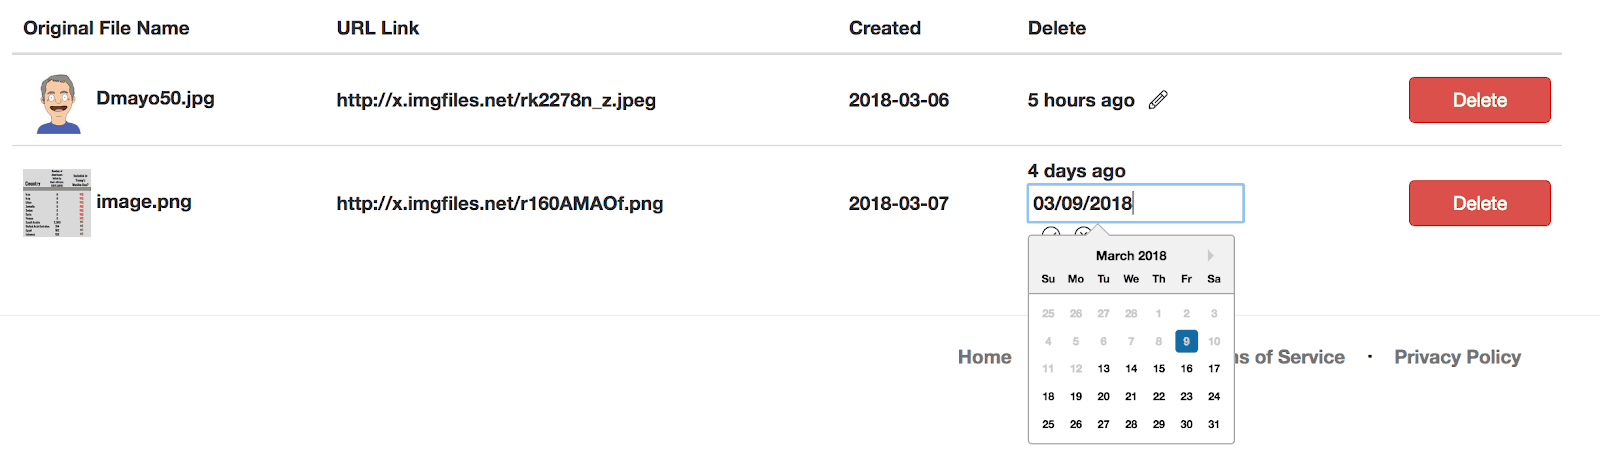
The design specs required the date to be displayed as text and not in an ‘input’ box (see first row). To indicate that it could be edited, a pencil icon would be clickable and turn the text into an ‘input’ tag that could then be editable (see the second row, and note that the pencil icon is replaced with a clickable check mark that would submit the changed date).
The code for the Delete button is relatively easy. You just need to associate the unique row identifier, in many cases the database record number, with the ‘onClick’ event.
When the Button component (<Button />) is clicked, it calls a new function, ‘handleDelete()’, which actually does the deleting from the database.
Notice that by adding the functionality of the Delete button, we’ve started our refactoring of the dumb component. This action is “smart” because we are binding the action of the Delete button to the function that does something: tells the database to remove a record.
Recall our definition of a smart container: code that makes your application work. It’s doing something. It’s deleting a record.
To be honest, this functionality was included in the boilerplate code. It’s not that hard, you’re just having your code call another function that talks to the database and gives some feedback to the user upon completion, like an alert box.
Enhancing End-User Experience
Now, let’s step it up a notch. When we click on a button (the pencil icon), we’re not going to talk to the database from some other abstracted piece of code; instead, we are altering the DOM, what the end user sees right then and there.
There’s a bit of noise in the above code snippet, but it’s just the same dynamic <tr> block that we’ve been using to output a row of the database result. What we added are two icons (Font Awesome Pencil and CheckCircle). A basic if-then shorthand statement (‘this.state.editDate ? x : y’) separates them and determines which to show.
‘this.state.editDate’ is a “smart” way to keep track of what’s happening in your application. It’s called State. Basically, it’s a session variable. ‘editDate’ is initialized with ‘false’ because the date is not being edited. Notice in the Pencil icon component, there is an ‘onClick’ event that calls the function ‘changeFontAwesome()’, which changes this state.
Behind the scenes, built into the React Framework, this “smart” component will notice that the value changed, because it’s listening for all sorts of changes. The component will then re-evaluate the if-then shorthand statement and show the ‘then’ statement based on the new value (‘true’).
So in the code above, the appearance of the row changes from looking like the top row with the Pencil icon, to the second row with the ‘input’ text box and CircleCheck icon.
In addition to the change in the Font Awesome icon, we’ve enhanced the ‘input’ box to show a calendar (‘<DatePick />’) when it has focus, to aid in changing the date. This is a pretty common enhancement in applications today.
I saved this code and ran the application. It looked great. All of the date fields were displayed as text, and each had a pencil icon next to it. But then, guess what happened?
I clicked on the pencil and all of the dates changed over to ‘input’ boxes—not just the row I’d clicked on. Ugh. Makes sense in hindsight. The ‘changeFontAwesome()’ function wasn’t bound to any specific row. It didn’t know which row to target, which row to change. Not what the specs called for. I really needed a “smarter” component so it would know which pencil was clicked and, therefore, which ‘input’ box to show.
Refactoring Into Self-Contained Smart Code
One of the nice aspects of modern day frameworks is the tendency to create small chunks of code that do one thing, and only one thing. Like this code’s ‘handleDelete()’ function.
As we’ve been refactoring our dumb component, we’ve been adding more functionality. Our code base is doing more than one thing, more than just outputting database rows. We’re deleting rows and changing dates.
So what are we going to do? Let’s have our ‘Output’ component handle the non-dynamic output. It’ll contain all of the HTML that sets up the <Table />. And then, between the <tbody> tags where the dynamic database rows would go, we’ll call a new function (<CustomRow /> Component) that deals with just one row of data.
 This is still the same dynamic <tr> tag within the ‘map()’ method that we’ve been dealing with. We’ve just abstracted it out to its own code base. This new snippet is much easier to read: We have a loop going over a database record set and passing the values to a component called CustomRow, which would seem like it would return a row of data (which it does).
All of that code that we moved remained the same. We just moved it. A nice benefit is that code in the CustomRow component is now self-contained.
So what now, you ask? Well now, when we click on the Pencil icon, there’s only one possible <FontAwesome /> component to change, because the <CustomRow /> component doesn’t know about any other rows, just the one row with the one <FontAwesome /> component to change.
Even though this component is called many times over, each output is self-contained. Yay.
Housekeeping and Final Steps
Let’s finish this refactoring. Recall that the ‘handleDelete()’ function we called, which was outside of the ‘Output’ function, made this component “smart.” Since the <CustomRow /> component is self-contained, we’ll need to move any functions that do something on a row, into the <CustomRow /> component.
A common way to group the functions, which is now available with ES6 syntax, is to convert the component to a Class. This is the final step in making a smart container. A Class allows all of the interior functions and components to easily talk to each other, pass data around, get and set things (getters/setters), and keep track of State.
Now That’s a Smart Component
Refactoring a dumb component into a smart one isn’t too difficult once you understand the differences between the two. There are some boilerplate sections that are needed, like custom methods and functions that add functionality as well as keep track of props and state, for example.
Expanding your skill set can be very frustrating when tools and learning aids don’t go into enough explanation. I know that when I tried to make a boilerplate code base fit my project, the basic explanation wasn’t enough for me.
Going through the exercise I outlined above helped me complete my new project and learn a lot more about how React keeps your complex codebase simpler without sacrificing UX.
If you’re looking to expand your skills, learn a new framework. And if you’re looking to turn dumb components into smart ones, I hope my experience helps you find your way, too.
If you are interested in the full before and after code bases, please visit these Github Gists:
Before, Dumb Component (link 1).
After, Smart Component (link 2).

Related Articles

12 REALITIES of Daily Life as a Programmer
What’s the daily life of a programmer like? A programmer’s daily life consists of auditing and debugging code, coding new…

13 POWERFUL Productivity Tips for Developers
Great productivity is one of the best soft skills you can have as a developer. I’ve used these tips to…

Impostor Syndrome as a Programmer
Believing that you’re somewhat unqualified for your job is a problem faced by the best of us. When those thoughts…