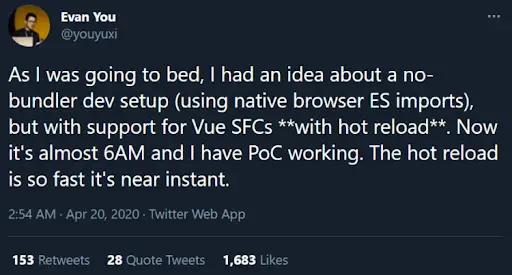
Back in April 2020, the developer community started to get hints of a new development server from Evan You (the creator of Vue.js, the popular JavaScript framework). Here’s the first tweet he shared about the idea he was working on.
The initial goal of ViteJS was to improve the development experience of Vue apps by providing a dev server faster than Vue CLI’s. But this new build tool turned out to be a lot more than that. In February 2021, Vite 2 was launched as its first stable version, and Evan soon declared that this next-gent front-end build tool would be the foundation for future Vue-oriented tools.
So, if you have come from the realm of JavaScript and worked with Webpack, Gulp, Grunt, and other traditional tools to create and bundle the entire app codebase, there is something new for you: ViteJS. This advanced front-end tool can refresh the dev server in the blink of an eye and dramatically reduce the development time.
Interesting enough? Whether you’re an experienced programmer or a newbie, this guide will help you understand how ViteJS works, how to install and set it up, create a SPA with it, and more.
How Does ViteJS Work?
Before you start with the installation guide, it’s important to know how ViteJS works so that you can use this tool correctly without any confusion.
Generally, Vue developers use Vue CLI (includes Webpack internally) to set up software projects during development and production. But this process comes with a couple of issues that the development team has to face quite often:
- If you want to start developing, you have to bundle the whole app first. As a result, the cold server starts really slow, especially for large-scale projects.
- Hot Module Replacement (HMR) might be very slow in large-scale projects as well.
ViteJS mitigates these drawbacks by compiling code-on-demand. It compiles only the imported code on the present screen so that the performance of HMR gets decoupled from the total number of modules. Meaning, HMR updates become regularly fast irrespective of the size of your app, and the page reloads in a flash.
Getting Started with ViteJS Installation
As the very first step of working with ViteJS, you need to install a copy of Node on your system.
I have chosen Node because it’s one of the greatest tools to build real-time web applications. It offers cross-platform applications which run easily on any web. Moreover, as developers, we don’t need anything extra to execute a Node application.
Also, Node.js offers a set of built-in modules that can be used without further installation. We can install some custom modules from the NPM as the application requires. Hence, Node is a suitable and reliable option for ViteJS installation.
Once you complete the process, execute the command npm init @vitejs/app. You will then get to choose a project name and template. Here are the options you can select from at the time of writing:
vanillavuevue-tsreactreact-tssveltesvelte-tspreactpreact-tslit-elementlit-element-ts
Important files, such as lit-element-tsstyle.css, favicon.svg, main.js, index.html and many more are used for Git and npm. The package.json file only includes ViteJS as a dependency, along with some scripts to set up the development environment and initiate a build.
Here, some other files for Git are used. Git is a DevOps tool used for source code management. It is a free and open-source version control system used to handle every project size. Moreover, Git is used to track changes in the source code, enabling multiple developers to work together on non-linear development.
Now it’s time to move to a directory path, open a terminal, and run npx create-vite-app

Once you have successfully called the command, move to your project directory with the cd command. You have to install the application dependencies by writing and running the command npm install.

By executing the above command, you will open the app in VS code.
You can then initiate the dev-server and execute the app with the npm run dev command.

You will be able to access and view the app at http://localhost:3000/. If you need to edit any of the project files, the screen will instantly reflect all the changes.

Now, something like the above image will be seen on your display screen.
By this time, your application should be running just fine.
How Hot Module Replacement (HMR) Works in ViteJS
In order to understand how ViteJS HMR works, let’s use the component Hello.vue inside the component folder.
Here’s what the executed code will look like:
<template>
<h5>{{ msg }}</h5>
<button @click="count++">count is: {{ count }}</button>
<p>
Edit
<code>components/Hello.vue</code> to test hot module replacement.
</p>
</template>
<script>
export default {
name: "Hello",
props: {
msg: String,
},
data() {
return {
count: 0,
};
},
};
</script>
The reload time of ViteJS is a lot faster than typical VueJS apps; hence any changes you make to the code will be visible on the screen.
In Vuejs, the main.js file runs under the hood. If you need to review the code on the browser through the menu, it calls the main.js file as a module.
This is how the module looks:
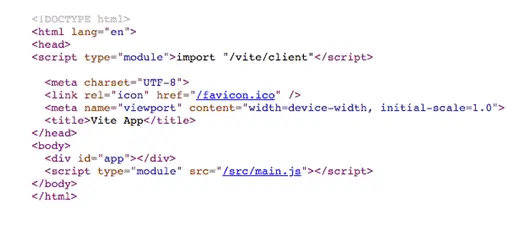
As you can see, instead of a bundle, ViteJS offers modules that make the whole app blazing fast.
Now your Vue.js code is all ready to run smoothly!
Setting Up ViteJS Vue Router
You may wonder why you need to install and set up the Vue Router. The reason is that it’s the official router for working with Vue.js and creating Vue apps. Learning how to install and set up the Vue Router with ViteJS will surely be helpful for your ViteJS project.
To start with the installation, you need to first install vue.js packages on your ViteJS app.
Run the command npm i --save vue-router@v4.0.0-alpha.11 and install the latest version of Vue Router.
Next, you have to create a router.js file. Here’s how you should define the routes:
import { createWebHistory, createRouter } from "vue-router"; import Home from "./components/Hello.vue"; const history = createWebHistory(); const routes = [{ path: "/", component: Home }, ]; const router = createRouter({ history, routes }); export default router;
After you successfully execute the code, it’s time to register the register.js file with the main.js file by calling the following command:
import { createApp } from 'vue' import App from './App.vue' import './index.css' import router from "./router"; createApp(App).use(router).mount('#app')
The next step is to change the root component in the App.vue file to render all the components.
<template>
<img alt="Vue logo" src="./assets/logo.png" />
<Hello msg="Hello Vue 3.0 + Vite" />
<router-view />
</template>
<script>
import Hello from "./components/Hello.vue";
export default {
name: "App",
components: {
Hello,
},
};
</script>
Now you can choose any other custom route and register it seamlessly.
Setting Up a Single Page Application (SPA)
Wondering if ViteJS works with single-page applications or not?
Let’s try to set one up with Vue.
Run npm init @vitejs/app and then choose the Vue template of your choice. You will get Vue, ViteJS, and a Vite plugin to compile Vue.
Developing a SPA will require you to handle routes. So, you have to install the Vue Router.
However, ViteJS is not really helpful in this process. With a basic Vue setup, we have to be careful about what we plug into Vue. Although ViteJS is also useful to create multiple pages, as outlined in the multi-page app in the documents, you must tweak ViteJS’s rollup configuration.
But, on the brighter side, I found a fairly new plugin made by the community: vite-plugin-vue-router. Just like Nuxt, it creates a router based on your file paths.
Given the expertise of the Vue-Vite community, we can positively expect that someone will soon create a Vue+Vue Router+Vuex template for ViteJS. But the chances of it being better than Nuxt are honestly less. The same applies to the scenario with Svelte and SvelteKit/Supper, React, and NextJS. These are the top frameworks for web app development, getting consistently optimized for complex apps and their own libraries.
If there is no battle and time-tested web app framework for your chosen programming language, ViteJS is definitely worth a shot, leaving aside the fact that it would still need some configuration.
Back-End Integration with ViteJS
Some codebases don’t support Jamstack but use PHP or .NET as a back-end. ViteJS has efficiently come up with a back-end integration page that will guide you to creating improved CSS and JavaScript bundles.
After ViteJS follows the instruction, it generates a manifest file that includes all the information about created bundles. This file will help you build the <script> and <link> tags for the JavaScript and CSS bundles, respectively.
Every import becomes a main.js file, except the dynamic imports that are bundled into separate bundles.
ViteJS, an Opportunity for Improvement
Being in the tech industry for over a decade, I have used multiple build tools for hundreds of projects. No matter whether it was Webpack, Gradle, or Gulp, large-scale projects always used to take a day or two to set up and ensure everything was working fine. Then came the tasks of optimizing build times, improving bundle optimization, and fixing bugs.
In contrast, ViteJS is a lightning-fast frontend tool. With a smooth front-end development experience, it has saved me a lot of time in the development and production environment that otherwise takes a toll on my efficiency and productivity. Undoubtedly, it’s biting at the heels of all other build tools that reigned in the front-end development world over the last decade.
While a lot of improvements and fixes are on the way, ViteJS still presents you with an opportunity to flex your coding skill and be a proficient front-end developer.

Related Articles

How to Become a GREAT Software Engineer (Without a Degree?)
If you’re thinking of becoming a software engineer (or developer – they’re very similar, as we’ll talk about below) ……

Best Practices for Mobile UX Designs
As per a report compiled by Statista in 2021, the number of mobile users worldwide stood at 7.1 billion. It…
The Programmer’s Guide to Health & Well-Being in Challenging Times
Staying physically and emotionally healthy during challenging times is never easy. And it’s safe to say that the past few…