Introduction
\n\nParallel test execution involves running a suite of automated tests in parallel as opposed to sequentially. You don’t execute your tests one by one. Rather, you take the entire batch and split it up amongst multiple servers so that each server can run a single test at a time. This techniques has some fantastic advantages to improve your overall software development life cycle.\n\nFirst, running your tests in parallel can significantly decrease your execution time. If you have enough resources to run all of your tests at once, then the duration of the test execution will last only as long as your slowest test. For example, if you have 100 tests and 100 virtual machines on which to run these tests, then dividing them in parallel will allow you to run 100 tests at once. If your slowest test takes two minutes to run, then that is how long it will take for the entire test suite to execute.\n\nRunning these 100 tests sequentially will take you magnitudes of times longer because you can only execute one test at a time. Therefore, you need to add all of the test run times together to understand how long that will take. If we assume that each test takes two minutes to run, then running them sequentially will take 200 minutes of run time. That’s a 5000% difference!\n\nThe second advantage that parallel test execution has over sequential test execution is that it gives your team a faster feedback loop. If your test suite can execute faster, then your team can have feedback faster on which to act upon. This is an amazing thing that the entire IT industry is shifting towards. Continuous delivery wouldn’t be possible if your entire test suite needed 10 hours to execute.\n\nTherefore, in this tutorial, I am going to teach you how to do the following:\n\n
- \n
- Run automated functional tests through Selenium Webdriver in parallel on your computer.
- Run automated functional tests through Selenium Webdriver in the cloud using BrowserStack.
- Run automated functional tests through Selenium Webdriver in the cloud using Sauce Labs.
\n
\n
\n
\n\nPrerequisites\n\nI am making the assumption that you have the following:\n\n
- \n
- Visual Studio installed
- General knowledge of C#
- Understanding of Selenium Webdriver
\n
\n
\n
\n\nIf you need any extra help throughout the tutorial:\n\n
- \n
- Free video tutorials on this topic
- Code base used in this topic
- Github tutorial
- Resharper tutorial
\n
\n
\n
\n
\n\n
How to Execute Automated Tests in Parallel Locally
\n\nCreate a Class Library project in Visual Studio.\n\n \n\nGo to NuGet package manager to install appropriate packages.\n\n
 \n\n
\n\n
Search for Nuget packages
\n\nIn this step, you are going to install:\n\n
- \n
- Selenium.Webdriver
- Selenium.Support
\n
\n
\n\nThe package source should be set to “nuget.org”.\n\nProductivity Tip: To save a little bit of time, you can install the Selenium.Support package which will automatically install the Selenium.Webdriver.\n\n \n\n
\n\n
Check Your References
\n\nIf you installed the Nuget Packages successfully, you will see them in the “References” section of your Solution Explorer.\n\n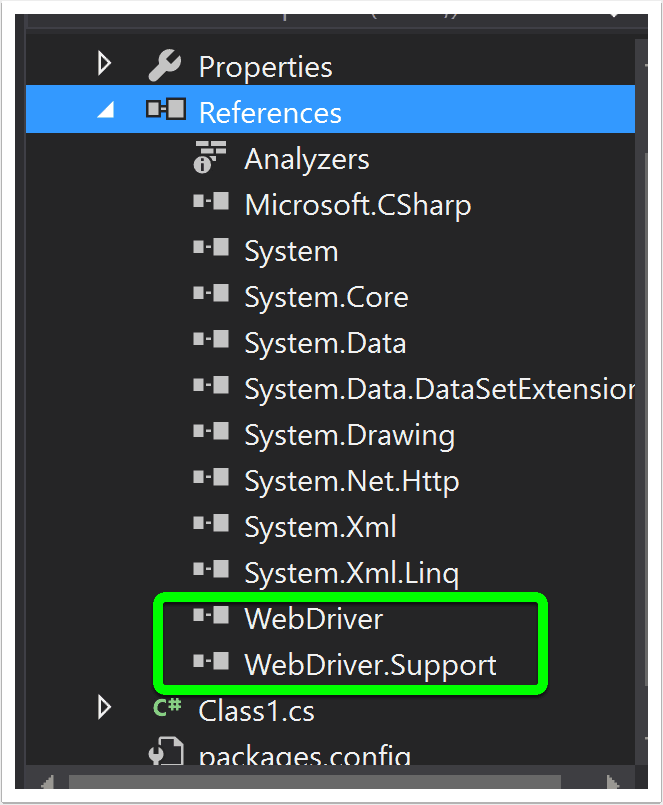 \n\n
\n\n
Install Nunit Nuget Package
\n\nAlso, install Nunit Nuget package, so we can execute our tests through NUnit. At this time, I had version 3.0.1.\n\nCaution: You will need an NUnitTestAdapter to be able to execute your automated tests through Visual Studio. However, installing v 2.0 of the NUnitTestAdapter from the Nuget will not work. Instead you need the Extension! (At least it didn’t work for my configuration of Visual Studio 2015. I spent hours troubleshooting this problem, and found a solution that I will discuss later. Keep this in mind, so you do not go through the same nightmare that I faced.)\n\n \n\n
\n\n
Install Nunit3 Test Adapter Extension
\n\nThis step is mandatory if you are running the same exact setup as I am. This will allow us to actually run NUnit tests from Visual Studio.\n\n
- \n
- Go to “Tools.”
- Click “Extensions and Updates.”
\n
\n
\n\n \n\n
\n\n
Search for “Nunit”
\n\n
- \n
- Click “Online.”
- Search for “Nunit.”
- Install “Nunit3 Test Adapter.” Because we installed NUnit 3 Nuget package, we need the NUnit 3 Test Adapter. Seems logical to me, and I would assume you need to match the NUnit Test Adapter version to your NuGet NUnit version as well. However, since I only have Visual Studio 2015, I cannot guarantee this.
\n
\n
\n
\n\n \n\n
\n\n
Check References
\n\nLook at your references and make sure that you have all of the appropriate Nuget packages installed: WebDriver, WebDriver.Support, and Nunit.\n\n \n\n
\n\n
Run Your Tests Using F5
\n\nWhen you attempt your tests, you will get the error below. This is simply because you created a project of type Class Library. This project does not contain a Main method for our application to enter and start running.\n\nLet’s fix this.\n\n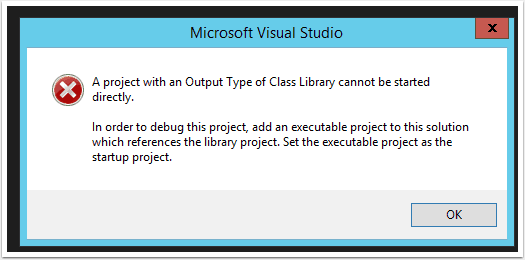 \n\n
\n\n
Add the [TestFixture] Attribute to Your Test Class
\n\nThis tells Nunit that this class contains tests and, optionally, setup or teardown methods.\n\nMy Resharper is smart enough to pull in all of the references into my tests for Nunit. If you don’t know about Resharper, learn it and drastically improve your coding speed.\n\nHowever, if right now your goal is to get through this parallel testing tutorial and you only have Visual Studio 2013 or earlier, you will need to add the following line to the top of the references(without the quotes):\n\n“using NUnit.Framework;”\n\nMy Visual Studio 2015 was smart enough to figure this out as well. Using “Ctrl + .”, you can have Visual Studio fill in those details.\n\n
Add the [Test] Attribute to Your Test Method
\n\nThis will tell the testing framework what is a test that should be ran.\n\nMy final code can be found below. You can always download the code for free as well if you want it for reference. If you want video tutorials on this, that’s available for free as well.\n\n\n\n
Run Your Nunit Test
\n\nYou should now be able to run this test, using the updated code above.\n\nBuild the code first so that Visual Studio can find the tests. Then, in the Test Explorer pane, you will be able to see your single test called Test1. Press the “Run All” link to run all of the tests.\n\nSuccess is so sweet!\n\n \n\n
\n\n
How to Run Tests in Parallel
\n\nCaution:\n\nThe current version of NUnit (3.0.1) cannot run multiple tests inside of a test class in parallel.\n\nIt will only run those sequentially; trust me, I tried. Therefore, if you want to run your tests in parallel, you will need a single test class for each test.\n\nCopy over your test to a different class.\n\nUpdate your second test to be a little different than the first. My code looks like this:\n\n\n\nAdd the [Parallelizable] attribute to each of your classes. This will allow your tests to run in parallel.\n\nBuild your code so that your new test is discovered in the Test Explorer menu. I do this with F6 in Visual Studio 2015. You are now ready to run your parallel tests.\n\n![]() \n\n
\n\n
Execute Parallel Tests
\n\nGo ahead and run your tests in parallel in your local browsers by pressing the “Run All” button in your Test Explorer. One test should pass and one should fail if you were following along with my tutorial.\n\nThat’s it!\n\nYou have successfully created tests to run in parallel using your local resources.\n\n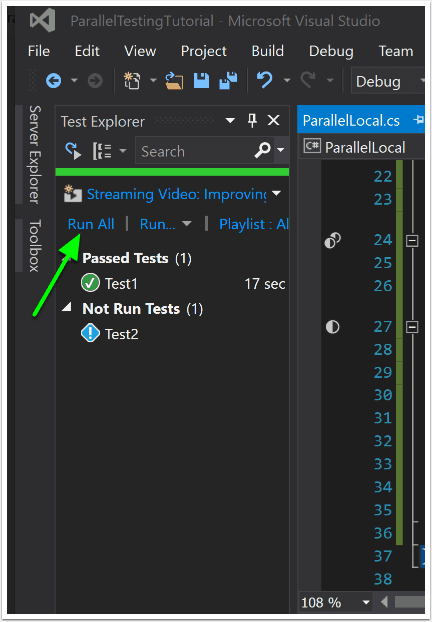 \n\n
\n\n
Advantages and Disadvantages of Running Tests Locally
\n\nAdvantages\n\n
- \n
- You can run multiple tests at once that are only limited by the hardware of your computer. It will decrease execution time, because your longest run will be as long as your slowest test.
- If this is all you have available, then this is much better than running one test at a time sequentially.
\n
\n
\n\nDisadvantages\n\n
- \n
- One of the biggest problems with local testing is that you have to maintain the software. Therefore, you will need to maintain the latest versions of Selenium Webdriver and all of the browsers. This is an extremely painful process. I have problems with this all the time as things get out of sync at some point. If you decide to go the Selenium Grid route and start using multiple virtual machines for this process, you will need to maintain those as well as the updates, configurations, and so on. At the same time, you will need to write frameworks and do your job as a QA Engineer. It’s almost impossible to do all of these well and certainly isn’t worth your time.
- You can only run a small number of parallel tests at once on your computer. You need large computing capacities to be able to run 50 browsers at once. Therefore, you are limited by the computing resources that you have.
\n
\n
\n\n
How Do You Overcome the Disadvantages of Local Parallel Testing?
\n\nDo not get discouraged by those disadvantages, however. Having the capability to run parallel tests on your local host is much better than running tests sequentially. Your work environment will dictate what resources are available to you. Therefore, even if you can only run tests in parallel on your local computer, take that option.\n\nRunning tests sequentially is the most basic and inefficient way to execute your tests. The next logical upgrade is to run your tests locally, in parallel. After this, you can move to running tests in parallel on multiple servers. Finally, the most efficient and my favorite way to execute tests is covered below.\n\nTo overcome the annoying problems of having to maintain all your own hardware and software, you can go to the cloud. There are amazing services like SauceLabs or BrowserStack that help you do this.\n\nTesting in the cloud is really amazing. Some of the benefits that you get are:\n\n
- \n
- Test in parallel with as many VMs as you want. Run 1000 parallel tests if you have the money.
- Test in any combination of browser and OS. They have over 700 browser/OS combinations that you can run against. You can even test mobile.
- They automatically record logs, screenshots, and videos for you. No work on your end. This makes debugging for Automation Engineers and Developers a breeze.
- They have Continuous Integration plugins for tools like Jenkins, so you can easily set those up.
- Nobody needs to waste time maintaining any kind of software or hardware.
- Automation Engineers can now spend more time creating tests and less time doing other tasks
\n
\n
\n
\n
\n
\n
\n\nReally. Testing with these services will take your automation to a completely different level. It would take me multiple years and multiple resources to be able to achieve such an amazing framework. It’s best to just plug in and utilize the awesomeness that already exists.\n\n
How to Execute Selenium Webdriver Tests in Parallel with BrowserStack
\n\n
What is BrowserStack?
\n\nBrowserStack is a cloud based service that allows you to do automated software testing using Selenium Webdriver. They maintain a large matrix of browsers and operating systems to make cross browser functional testing easier. At the time of this post, they had over 700 possible combinations. Basically, you have the capability to run on Mac, Windows, Android, iOS, and many combinations, simply by passing in the correct configuration.\n\nPersonally, I love running my automated Selenium Webdriver tests in the cloud. Compared to running them locally, the advantages are light years ahead. Give it a try; the difference is drastic.\n\n
Setting up for Parallel Testing in BrowserStack
\n\nPrerequisites:\n\n
- \n
- A BrowserStack account, so you have a username a key to run in their cloud – Free Trial Sign Up
- BrowserStack Documentation
\n
\n
\n\n
How to Get Started Using BrowserStack
\n\nAny Selenium Webdriver cloud automation system is very similar to running our tests locally. The main difference is that, rather than creating a local driver that points to an executable like FirefoxDriver or ChromeDriver, we create a RemoteWebDriver. We pass in a URI and capabilities to that driver so that we can execute our tests in the cloud.\n\nTo set up the code to run BrowserStack tests:\n\n
- \n
- Set up another Visual Studio C# Class library project just like before. As always, you can just download my code. But you will have the best retention rates if you actually practice what you learn. It’s best to learn something well one time, as opposed to many times with poor comprehension.
- From the BrowserStack site, I copied the code snippet that was there to get me started. I will modify it a little to match my needs. However, what you will notice is all of the compilation errors after you paste the code into your solution.
\n
\n
\n\n \n\n
\n\n
Fix the Compilation Errors
\n\nYou need to fix these errors before you can proceed.\n\nProductivity Tip: If you have ReSharper, you can quickly do this using their shortcut “Ctrl + Enter.” This will allow you to search for all of the broken directives in Nuget and bypass the process of doing that manually like we did above. Take a look.\n\n \n\n
\n\n
Using ReSharper to Fix the Broken Directives
\n\nReSharper can quickly search Nuget and find the packages to help me fix my broken directives. By the way, I am not affiliated with Jetbrains at all. I just really think that their product is freaking sweet, and I give them props!\n\nIn less than one minute, I installed three Nuget packages and fixed all of my compilation errors. Now that’s an effective product.\n\nIf you don’t have ReSharper, just follow the steps that we did above to download all of the appropriate Nuget packages. These are the same ones that we used for the local automated testing.\n\n \n\n
\n\n
Setting up Tests to Run in Parallel with BrowserStack
\n\n
- \n
- After all of your compilation errors are gone, make sure to get your username and access key from your BrowserStack account.
\n
\n\nProductivity Tip: If you are logged in to BrowserStack and you are copying the code sample that they provide, your access key and username will be present in the code sample, and you do not need to take any further action.\n\n
- \n
- Update the Init() method of the class to use the capabilities that we desire. In this case, I am going to make my tests run in different browser and OS combinations.
- On BrowserStack’s help page, they have a section called “Setting your operating system, browser, and screen resolution” that allows you to pick your browser and OS combinations and then gives you a code snippet to paste into your test. Pick whatever combination you want and paste that into your Init() method.
- Copy the entire class and create another test. Rename the class and the methods appropriately to help you when running the tests. Take a look at the code sample below if you are confused.
- Do this as many times as you want. Remember, each class will represent a test so that NUnit can run in parallel through BrowserStack. Rename all of the classes and methods as necessary. Also, these tests aren’t as efficient as they could be. I am simply demonstrating how to run tests in parallel. You can always take it a step further and abstract out the Init() and Cleanup() methods to a base class and decrease the redundancy.
\n
\n
\n
\n
\n\nIf you are new to C# and don’t understand how to structure classes, you can learn that in the Complete Selenium Webdriver with C# Course.\n\n
- \n
- Finally, add the [Parallelizable] attribute on each of the classes like before.
- Don’t forget to update your username and access key before running the tests.
\n
\n
\n\nYour code is going to look like the sample below. As always, you can download the code as well.\n\n\n\n
How to Run the Parallel Tests in BrowserStack
\n\n
- \n
- Build your solution so that the Test Explorer can discover the new tests that you just added.
- Right click and select “Run Selected Tests.”
\n
\n
\n\n \n\n
\n\n
Tests Running in Parallel
\n\nCheck that out! Four awesome tests running in parallel. My subscription allows me to run up to 40 tests in parallel.\n\nPlay around with BrowserStack a bit. Notice how our tests automatically have recorded video, text logs, and visual logs. We didn’t need to do anything to get this capability. They just include it.\n\n \n\n
\n\n
How to Run Tests in Parallel Using Sauce Labs
\n\n \n\n
\n\n
What Is Sauce Labs?
\n\nSauce Labs is very similar to BrowserStack. It is also a cloud based system that allows you to execute automated test cases in the cloud. They host the infrastructure and allow you to run your tests on hundreds of different operating systems and browsers. I prefer Sauce Labs to BrowserStack for a few reasons:\n\n
- \n
- They were established earlier and have an overall better platform.
- Their documentation is excellent and makes integrating with their technology really easy.
- Overall, they have more features than BrowserStack.
\n
\n
\n
\n\nBut either of these solutions is light years ahead of local functional GUI testing with Selenium Webdriver. So take what you can get.\n\n
Getting Started with Sauce Labs
\n\n
- \n
- As with most of these tools, you need an account. Get a Free Trial if your company does not have accounts.
- The documentation on Sauce Labs is really great. You can follow it to get your code running.
\n
\n
\n\nBasically, you do everything that we did before, by installing all of the Selenium Webdriver Nuget packages and NUnit.\n\n
Copy Source Code and Fix Compiler Errors
\n\n
- \n
- Copy the source code on their help page and paste that into your class in Visual Studio. You will now have a lot of compiler errors. In my example, I see 41.
- Just like before, allow your intellisense to help you fix these errors. Again, this was just an installation of Nuget packages, updating the test namespace, and making sure that the appropriate user and key are ready for Sauce Labs.
\n
\n
\n\nMy final code looks like this and can be downloaded as well.\n\n\n\n
Where to Get the Username and the Access Key
\n\nWhen you are logged into Sauce Labs, you can get the access key and the username at the locations shown in the image. Update the code with the appropriate values for your personal account.\n\nIf you look at my code again, you will notice that I am using local environment variables to store my username and password. This is actually something that I learned recently from Dave Haeffner through a webinar. This is awesome because my code will always run locally. Also, I can share the code with you without needing to change it to mask my username and password.\n\n \n\n
\n\n
Final Requirements Check
\n\nBefore your run, make sure that you have all of this in place:\n\n
- \n
- The correct code downloaded.
- Nuget packages for Webdriver and Nunit installed.
- NUnit Extension installed.
- Your username and password saved to environmental variables. Or, you can just hardcode them into your code.
- All your tests have the appropriate attributes: [Test] for the tests and [Parallelizable] for classes. If you used the code that I provided, this shouldn’t be an issue. If you create your own code, keep this in mind.
\n
\n
\n
\n
\n
\n\n
How to Run Webdriver Tests in Parallel Using Sauce Labs
\n\n
- \n
- Build your code so that the Test Explorer can see all of your tests.
- In the Test Explorer, highlight the tests that you want to run. Since we are working with Sauce Labs, let’s select the Sauce Labs tests.
- After they are selected, right click and do “Run Selected Tests.”
\n
\n
\n
\n\n \n\n
\n\n
Where to See the Results for the Sauce Labs Run
\n\nLook at your Sauce Labs dashboard. You will see your two tests running in parallel. Take a look at the time stamps.\n\nIf you really want to put what you learned to the test, why don’t you add more tests to the Sauce Labs test suite and see if you can get them all to run in parallel?\n\n \n\n
\n\n
Some Cool Sauce Labs Features
\n\nThe reason that I like testing in the cloud way more than testing locally is because of all of the amazing features that these services offer. If you click on one of the tests, you can get a Command Log, Screenshots, Videos, Metadata, Selenium Log, and Interactive Sessions, all of which you can download.\n\nIn all of my years of automated software testing, I could never dream of having such sexy functionality built into my framework. With Webdriver and Sauce Labs, it’s really easy, and you get it out of the box.\n\nPlay around with these tabs, explore. It’s super cool what you will see :)\n\n
What Error Message?
\n\n
Nunit.Core.UnsupportedFrameworkException: Skipped loading assembly ‘{assembly name}’ because it references…
\n\nIf you run into this error, it’s because you are trying to use Resharper to run your tests. I made this mistake myself. Instead, use Visual Studio to execute your tests, and the tests will run fine through the NUnit extension.\n\n
Conclusions
\n\nIn conclusion, doing parallel testing with Selenium Webdriver has many benefits, like decreasing your execution time of the test suite and decreasing the length of the feedback loop that your tests provide. These benefits help to drive higher quality software through more efficient means, something that I strive for every day.\n\nIf you have the choice, try to execute your parallel tests in the cloud. The benefits that you receive like logs, videos, screenshots, and your work history are unparalleled to anything that you will be able to create yourself. All these extra services will help to make you more efficient by helping you to debug and allowing you to spend more time actually covering new functionality.\n\nAt this point, feel free to try this out on your own. Automate whatever tests you want and have them run in parallel. You can practice functional automated software testing on this practice page.\n\nThanks for taking your time to read my post. Feel free to leave any comments, questions, or insults. Again, here are extra resources if you require them:\n\n
- \n
- Free video tutorials on this topic
- Code base used in this topic
- Github tutorial
- Resharper tutorial
- Test Automation Framework Architecture
\n
\n
\n
\n
\n
\n\nAlso check out my course “10 Steps to Learn Anything Quickly” before you start wading through all these resources.

Related Articles

12 REALITIES of Daily Life as a Programmer
What’s the daily life of a programmer like? A programmer’s daily life consists of auditing and debugging code, coding new…

13 POWERFUL Productivity Tips for Developers
Great productivity is one of the best soft skills you can have as a developer. I’ve used these tips to…
Impostor Syndrome as a Programmer
Believing that you’re somewhat unqualified for your job is a problem faced by the best of us. When those thoughts…