Why is it important to have proper synchronization for your automated tests?\n\nHave you ever dealt with flaky automated checks? Checks that fail intermittently and you are unsure why? How about checks that fail in your Continuous Integration environment, but work locally?\n\nAll of these could be a result of improper synchronization within your tests. Synchronization refers to the idea that the speed of your automated check should coincide with the speed of the application under test (AUT). Basically, if the code of your automated check runs faster or slower than the actual AUT, you will experience all of the problems that I listed above.\n\nIf your code runs too fast, it will not find HTML elements on a page that you were expecting to be there. If your code runs too slow, you will be wasting valuable time during test execution. Either way, this destroys the reputation of your functional checks and deems them as “flaky” or “slow”. No automated check of yours should wear those scarlet letters.\n\nTherefore, proper synchronization techniques with automated functional GUI tests are extremely important for any Test Automation Engineer to know. This tutorial will take a very deep look at all of the timeouts and synchronization options available to you with Selenium Webdriver.\n\n
Pre-requisites
\n\n
\n\nI am making the assumption that you have or know the following:\n\n
- \n
- \nSome flavor of Visual Studio installed\n\n-Although I will teach using C#, most of the concepts and ideas here can be applied to other bindings like Java, Ruby, and so on.\n
- General knowledge of C#
- Basic understanding of Selenium Webdriver
- Understanding of element locators using HTML
\n
\n
\n
\n
\n\n
What Application Will we Test?
\n\n
\n\nThis is the AUT that we will be working with today. A Selenium guru by the name of Dave Haeffner uses this application to teach Selenium Webdriver. The goal of the test is really simple:\n\n
- \n
- Navigate to the page
- Click button with id = “start”
- Make sure that element with id = “finish” is present on the page
\n
\n
\n
\n\n
Improper Synchronization Example
\n\n
\n\nI wrote a quick test to give you an example of what can happen when your synchronization strategy isn’t up to par. Take a look at this code:\nIf you try to run the test in your Visual Studio, you will probably receive a similar message like in the image below.\n\n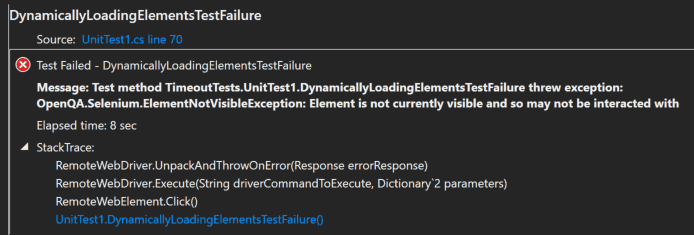 \n\nSo why did this test fail? Take a moment to think about it and walk through the application or step through the code.\n\nThe automated check failed because of improper synchronization. After pressing the “start button”, there is a loading screen that we must wait for 5 seconds. However, in our automated check, we don’t have such a synchronization point. Therefore, when our test executes the line of code below, the Webdriver API comes back within 500ms and says that this element is not visible. Of course, it’s not visible, there is a stupid loading icon that we didn’t account for:\n\nTo resolve synchronization problems, I will teach you 3 types of techniques to apply to your tests.\n\n
What is an IMPLICIT Wait in Selenium Webdriver?
\n\n
\n\nAn implicit wait in Selenium came from Watir’s implicit wait idea. Here we are telling the Webdriver to poll the DOM for a specific amount of time when trying to find an element or elements. The default setting is 0 seconds. Once set, the timeout is set for the life of the driver, until it is changed again.\n\n(Selenium HQ)\n\n
How do you use an Implicit Wait?
\n\nOnce you create a type of driver, you will have access to the ImplicitlyWait() method. This method takes a TimeSpan object which you can use to specify the maximum of time that you want the driver to wait before throwing a NoSuchElementException.\n\n
What are the Advantages and Disadvantages of Implicit Waits?
\n\nAdvantages\n\n
- \n
- It’s really easy and quick to create these type of synchronizations
\n
\n\nDisadvantages\n\n
- \n
- The timeout lasts for the life of the driver. There are instances where you want your automated checks to fail right away when they cannot find an element. Therefore, you will need to reset the wait during that time and remember to set it back to the original value after you are done because the rest of the tests will now use the new value
- Tests can be flakier or run longer as a result
\n
\n
\n\n
What Exception is Thrown by an Implicit Wait?
\n\nOpenQA.Selenium.NoSuchElementException\n\n
What is an EXPLICIT Wait in Selenium Webdriver?
\n\n
\n\nAn explicit wait is code you define to wait for a certain condition to occur before proceeding further in the code. The worst case of this is Thread.Sleep(), which sets the condition to an exact time period to wait. There are some convenience methods provided that help you write code that will wait only as long as required. WebDriverWait in combination with ExpectedCondition is one way this can be accomplished. (Selenium HQ)\n\n
How do you use an Explicit Wait?
\n\nExpectedConditions\n\nThese are a set of common conditions that can be used with the WebDriverWait class to check on the state of an object.\n\nSome of the most common ones include:\n\n
| Name | Description |
| ElementExists | An expectation for checking that an element is present on the DOM of a page. This does not necessarily mean that the element is visible. |
| ElementIsVisible | An expectation for checking that an element is present on the DOM of a page and visible. Visibility means that the element is not only displayed but also has a height and width that is greater than 0. |
| FrameToBeAvailableAndSwitchToIt(String) | An expectation for checking whether the given frame is available to switch to. If the frame is available it switches the given driver to the specified frame. |
| TextToBePresentInElement | An expectation for checking if the given text is present in the specified element. |
| UrlContains | An expectation for the URL of the current page to be a specific URL. |
\n\nA full list of all the ExpectedConditions can be found here.\n\n
What are the Advantages and Disadvantages of Explicit Waits?
\n\nAdvantages\n\n
- \n
- The explicit wait is dynamic and great for locating elements in between transition points. It will wait the maximum amount of time specified, but only if necessary
- Selenium Webdriver provides built in ExpectedConditions class out of the box so that we can check our web applications for different conditions with 1 or 2 lines of code
\n
\n
\n\nDisadvantages\n\n
- \n
- A larger barrier to entry exists as compared to implicit waits because we need to learn all the different ways that we can apply an explicit wait
- If using Thread.Sleep(), this can make our functional tests really brittle and slow
\n
\n
\n\n
What Exception is Thrown by an Explicit Wait?
\n\nOpenQA.Selenium.NoSuchElementException\n\n
Don’t mix Your Implicit and Explicit Waits
\n\n
\n\nA word of caution is to make sure that you do not mix implicit and explicit waits. The main problem is that implicit waits may be baked into the different components that are utilized by Selenium Webdriver, all the executables like ChromeDriver.exe, IEDriverServer.exe and so on. Therefore, when you are making multiple hops between the different implicit waits, you can stray into “undefined behavior” (Jim Evans).\n\nI strongly recommend that you just use the Explicit Waits.\n\nThis post does a good job of conveying the undefined behavior when mixing waits.\n\n
DefaultWait
\n\n
\n\nA Default Wait, also known as a Fluent Wait in Java is a type of wait that utilizes the DefaultWait class of the C# Webdriver bindings to set the synchronization timeouts. In Java, the WebDriverWait class inherits from the FluentWait class. However, in C#, the WebDriverWait class inherits from the DefaultWait class. Hence, the difference in nomenclature. Remember, the WebDriverWait class is the one that we use to construct our sexy explicit waits. Take a look at this snippet:\n\n
How do you use a DefaultWait?
\n\nThe DefaultWait class exposes all of the functionality to us to construct really controlled synchronization points. For example, we can set the polling interval, the exceptions to ignore, and even write our own custom message.\n\n
What are the Advantages and Disadvantages of DefaultWaits?
\n\nAdvantages\n\n
- \n
- Provides us a really fine tuned way of controlling everything about a Selenium Webdriver wait
\n
\n\nDisadvantages\n\n
- \n
- You need to define your own Expected Conditions to be able to use these functions
- Too much code required to create a simple synchronization point
- Most of the functionality is already exposed through the 2 constructors that the WebDriverWait has
\n
\n
\n
\n\nConclusions\n\nI created the table below to help you easily understand the difference between the three synchronization techniques that you can use to improve your test.\n\n
| Type of wait | Definition | Usage | Default Timeout(sec) |
| Implicit | Tell Webdriver to poll the DOM for a certain amount of time | https://gist.github.com/nadvolod/92aa44d6b1516cb65d7def7af2429726 | 0 |
| Explicit Waits | This is the code that you write to wait for a certain condition to occur before proceeding | https://gist.github.com/nadvolod/b3a4f1c44f229a18037d48290df4994e | .5 |
| Default Waits | This class allows you to specify the polling interval, the message, exceptions to ignore and much more. | https://gist.github.com/nadvolod/9249cd30ac71065da2d20242f3683ac0 | Depends on your implementation |
\n\nThe Selenium community recommends that you use Explicit Waits above all others because they provide the most benefit to your tests. However, using something like Thread.Sleep() is almost never acceptable. In my career, I have had only a handful of instances where I hardcoded my wait time. Rather, you should utilize WebDriverWait and ExpectedConditions for your explicit waits.\n\nThe DefaultWaits are nice to know, just to keep it in your back pocket. However, I have never had the need to use them. In fact, the most time that I spent with them was for this tutorial. In my opinion, the WebDriverWait class does an excellent job of exposing all of the relevant functionality to me without having to move up to the DefaultWait class. However, this does not mean that it won’t work for you.\n\nMaybe you will find some awesome use for this class. If you do, let me know, I would love to learn how you use this class.\n\nFinally, don’t forget that the entire goal of this tutorial is to make your automated checks more stable to deliver higher value to your employer. So, go and make your checks better. Until next time automation enthusiasts!\n\nAs you continue to learn more skills and concepts, do take a look at our Simple Programmer course: 10 Steps to Learn Anything Quickly.\n\n
Extra Resources
\n\n
\n\n
Good Code Isn’t What Gets You Paid
The developers landing the senior roles and the consulting offers aren’t better engineers than you. They’re known. RDU is John’s coaching program for developers who are done being the best-kept secret on the team.
Book Your Free Call →
Related Articles

Understanding Post-Covid Automation and Artificial Intelligence
In the space of a few days, the world went from functioning as we’ve always known into a global shutdown.…

9 Mistakes Most Automation Testers Make (But You Don’t Have To)
If you have decided to become an automation tester, you’re bound to make mistakes, especially if you are doing complex…

Enhance Your e-Commerce Development With Web Test Automation
Сompetition in the e-commerce market is growing by leaps and bounds. So if you want to stand out from the…