In my last post I presented two choices for unit testing in Android.
- Unit test on the real device or emulator using the real android framework
- Unit test on our PC using the JVM
Each choice has some pros and cons, but for me it came down to the speed and flexibility allowed by running in a real JVM. I actually tried to create an Android unit testing project using the scaffolding provided by Google but it turned out to be very restrictive, especially since I couldn’t use JMock.
There is also something to be said for being able to execute the unit tests extremely quickly. If you have to wait for an emulator to come up, or try to run them on a real device, it is less likely the unit tests will be run.
How to do it
The basic idea of this approach is fairly simple.
We are going to try and abstract away any Android specific calls from our application and then unit test the plain Java logic in the application just like we would any other Java project.
Step 1: Create a JUnit project
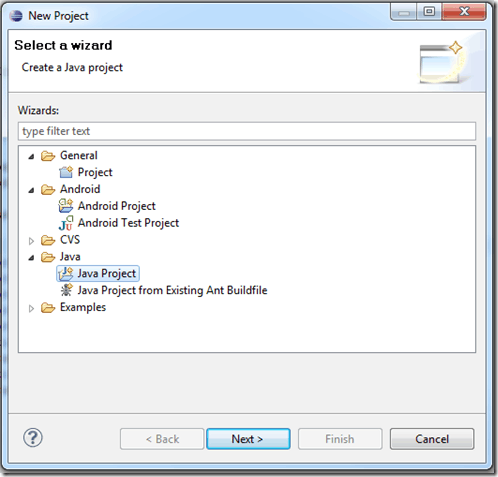
Create a new JUnit project just like you would for unit testing any Java application.
Make sure you chose Java Project rather than Android Test Project.
From here you can add your JUnit references to your build path. I would also recommend adding Instinct for doing BDD style testing. Instinct uses JMock internally to create mocks for you using a declarative approach.
The only other thing you will want to do with this project is to add the android.jar to the build path. The android.jar can be found in your Android SDK directory under the platform directory that corresponds to the API version you are targeting with your application.
For example, on my machine, I am targeting Android 1.6, so my android.jar is at: C:\Android\android-sdk-windows\platforms\android-4.
Now remember, you are including the android.jar in the project only so your classes can understand what types exist in the Android framework. If you even try to call a constructor on a class in android.jar, you will get an exception.
Step 2: Pull all the code you can out of the Activity.
The next thing we need to do is clean up our Activity class to make sure that it has the smallest amount of logic in it as possible.
Since we can’t actually instantiate any types that exist in the Android framework, we are not going to be able to create an instance of our Activity in the test project. So we are not going to be able to unit test our Activity. This isn’t a problem if most of the logic we care about testing exists in other layers in our system.
You can design the lower layers however you want. I am still not quite sure the best approach here, but what I did was put a presentation layer directly below the Activity. I have a Presenter class directly below the Activity that tells my activity what to do. The Activity passes on any interesting events or information to the Presenter.
You should leave the Activity with the responsibility of setting the text on its own view objects, but create methods for your lower layers to tell the Activity what text to set the objects to and so forth. Activity is going to act as an adapter to a large portion of the Android framework for your application.
Because the entrance point into your application is going to be the Activity, you will need to wire up the rest of your layers from the Activity. This is a little strange, but it works. In my application, I create a new Presenter and pass this into it on the constructor.
When you are done, your Activity should look pretty thin. It should delegate all its event handler logic down to the lower layers and act as a pass through for manipulating the view.
Step 3: Wrap remaining Android object calls.
You're going to find that some of the remaining Android API will need to be called from lower down than the Activity. This is not as big of a problem as it seems.
In my application I needed to make some calls to android.os.SystemClock. I needed to make those calls lower down than the activity because it is part of the heart of the logic of my application.
I created a simple SystemClockWrapper class that wraps system clock and delegates any calls to the real SystemClock class. Then I extracted an interface from that class called ISystemClock (hey, I like the C# convention for interfaces.)
Finally, in my application logic, I allowed the ISystemClock reference to be passed in or “injected” through the constructor of the class that used it.
In my unit test I just pass in a mock version of the ISystemClock interface.
One hint here is to use the refactor tool in your IDE to extract an interface. This can save you some time of trying to manually create interfaces for large pieces of functionality you are wrapping.
Putting it all together
Now you should be able to create your unit tests against most of your application logic and run them just like any other unit test project.
The only thing you won’t be able to do is unit test the logic in your Activity classes. This shouldn’t be much of a problem if you have made them into views, because they should only contain view logic.
If you really want to be able to write some tests for the Activity though, you can create another actual Android Test Project and use Google’s framework to write unit tests from there.

